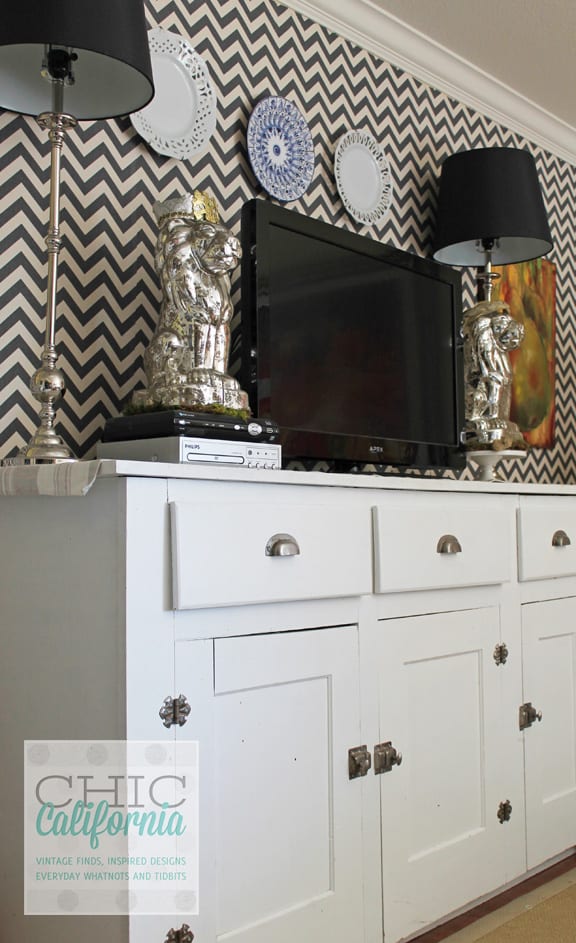
Ok guys, seriously. Do you ever see something and go “oh my holy no way what the really whaaaa?” Yup. Had one of those recently. I saw the gorgeous wall pictured above, and thought “wow, that is the coolest wallpaper. Too bad wallpaper is pretty much permanent, and a huge pain to work with, and really expensive…” But then, the decor gods shined upon me and a miracle occurred. I learned that this “wallpaper” isn't really wallpaper at all! It's – are you sitting down? – FABRIC. Applied only with STARCH. And it's TEMPORARY. And REUSABLE. And it's EASY. And it looks AMAZING. *enter beams of light and angelic music* So please welcome Adrienne from Chic California to tell us how it's done! Take it away, Adrienne.
Thanks Jordan! In the land of Chic California, we are renters. Which for someone like me, who likes loves to decorate and paint, then change her mind and paint again, renting can be torture!
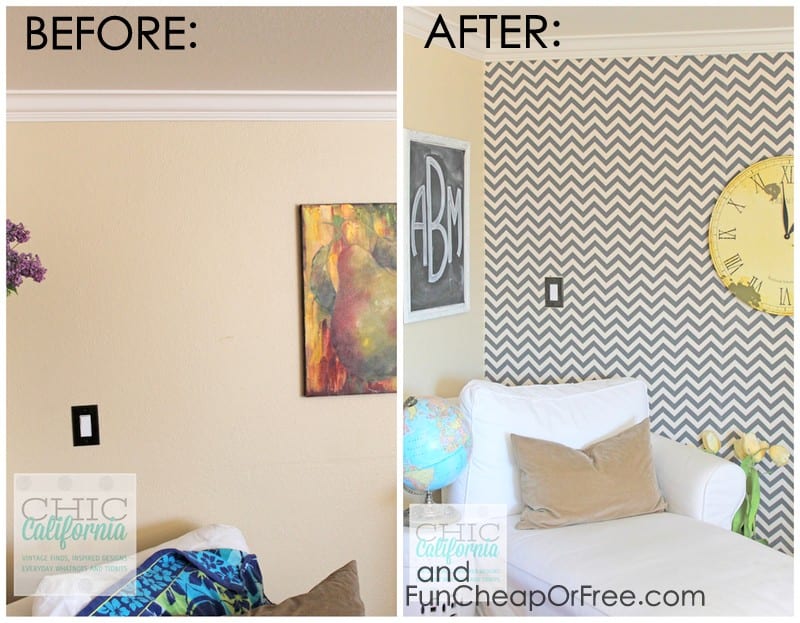
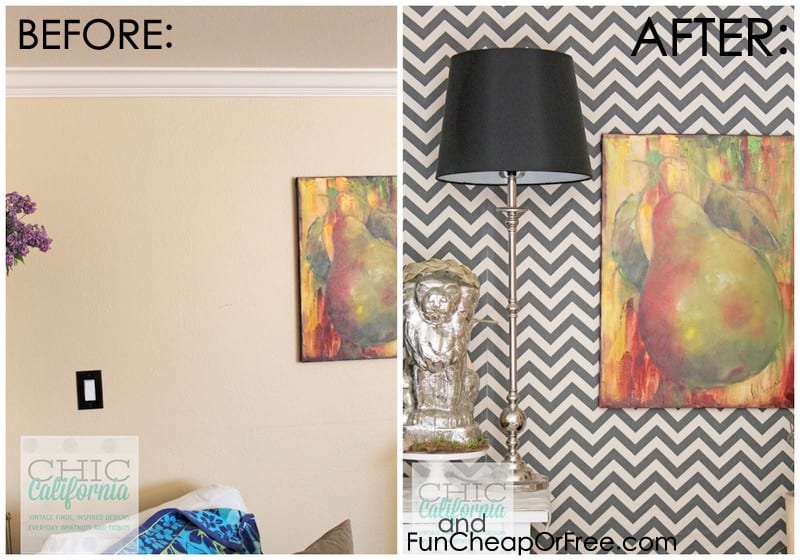
When we moved in everything was cream. I can promise you it is not the color I would have chosen. So what could I do other than get creative?! I decided to add some pizazz to our walls that wouldn't make our landlords hate us! It only took about 3 hours start to finish and had a much greater affect on the room than I ever imagined!
Here's how to make your own DIY faux wallpaper:
Here's what you need:
- Fabric
- Push Pins (lots of them)
- Spray Bottle
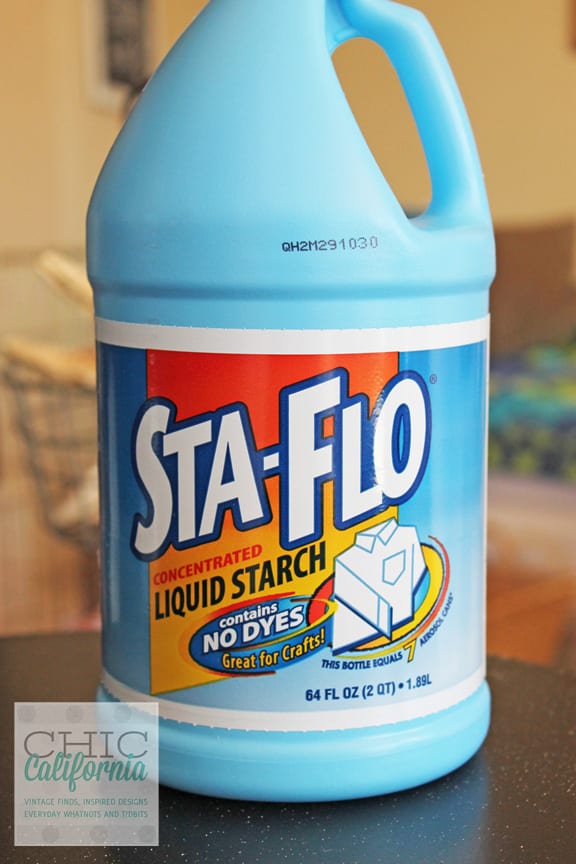
- Liquid Starch- I used Sta Flo that I picked up in the laundry aisle at Walmart for less than $2 a bottle. I ended up using 2 bottles for one wall.
- Drop Cloth
Here's what you do:
- First, figure out how much fabric to order.
Uggh, math. I measured my wall and converted that measurment to yardage using a handy dandy converter I found online. I figured I needed about 10 yards to cover my wall. I ordered 12 just to be sure. I figured I could always make something fabulous and chic out of the extra.
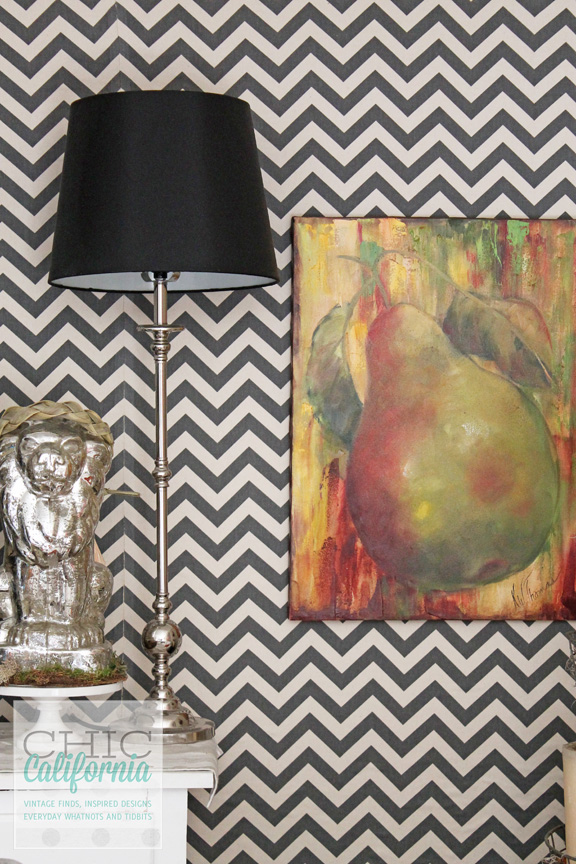
I found this fantastic Chevron fabric online at Hobby Lobby. It was perfect because it was a heavier canvas fabric and it had a creamier background instead of white like most chevron fabrics I have found.
![]()
- Next, fill your spray bottle with the liquid starch. I left it as-is and didn't thin it down, and it sprayed perfectly.
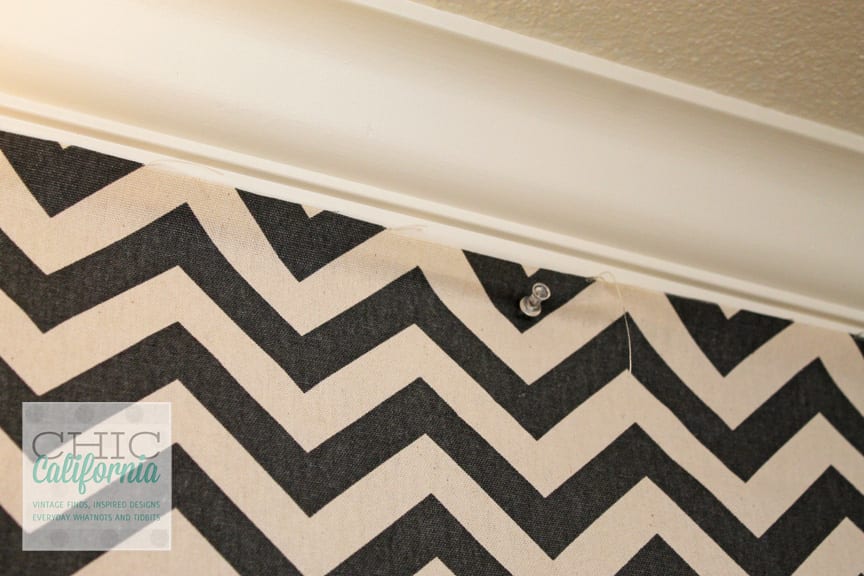
- Pin and hang the fabric.
I started by hanging the first piece of fabric with push pins along the top. Unless you have a helper or 4 hands, it is tricky to hold the fabric in place while spraying the starch and smoothing the fabric. I used the selvedge edge to make sure I had a straight line along the wall. I also left about an inch of extra material at the top that I would trim later. Once the top edge and some of the side edge was secured I started spraying.
- Spray the starch.
I sprayed the wall first, then the back of the fabric, then the front of the fabric until everything was pretty well saturated. I started with a drop cloth on the floor to catch any drips but I kicked it out of the way after awhile. My floors are wood so I knew I could mop any drips. If I had carpet I would have left it.

- Smooth and tug!
I smoothed the fabric, and pulled it tight as I went along.
On the second sheet of fabric I had to work around the light switch and outlet. I will admit I am kind of a sloppy DIY'er. So I just smoothed the fabric over the light switch and outlet and went back with a rotary cutter and cut around it.

If I was doing this again, I would be a more patient DIY'er and I would have removed the switch plate and outlet covers all together before I started applying the fabric.

- Correct as needed.
By my third sheet I hit a snag. My chevron was starting to slowly slope. Not sure if it was the fabric or me or my wall. So I carefully lined up the chevron to keep things on track. This meant overlapping my fabric a bit at the seam. When you are up close to my wall you can see the overlap. But because the Chevron is such a busy pattern from a normal distance it is not even noticeable.

You can barely see the seam in the uppers left hand corner.
- Smooth and final spray.
I continued to pin the top of each sheet of fabric until I got to the end of the wall. When I had all the fabric up I went back and gave everything another spray and smoothed out any air bubbles just for good measure.
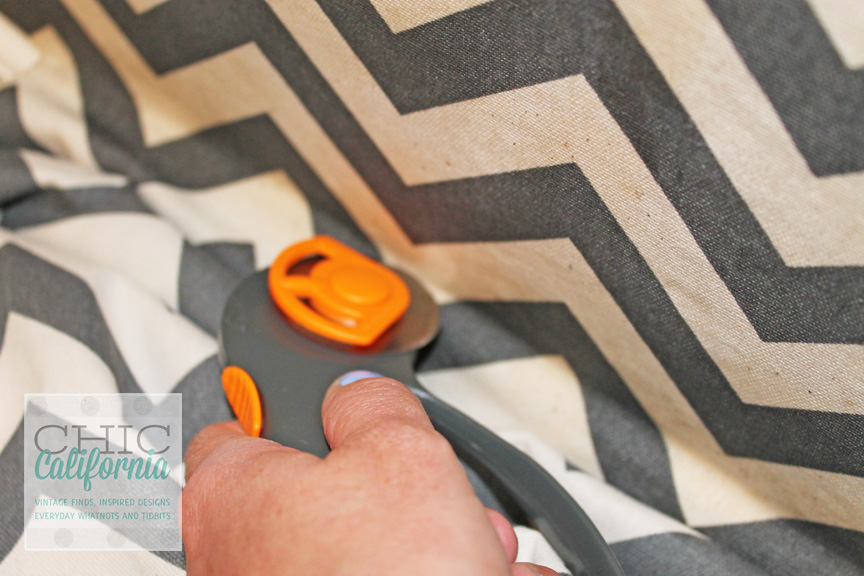
- Cut and trim.
The last thing I did was use my rotary cutter along the moulding and baseboards to cut the excess fabric.

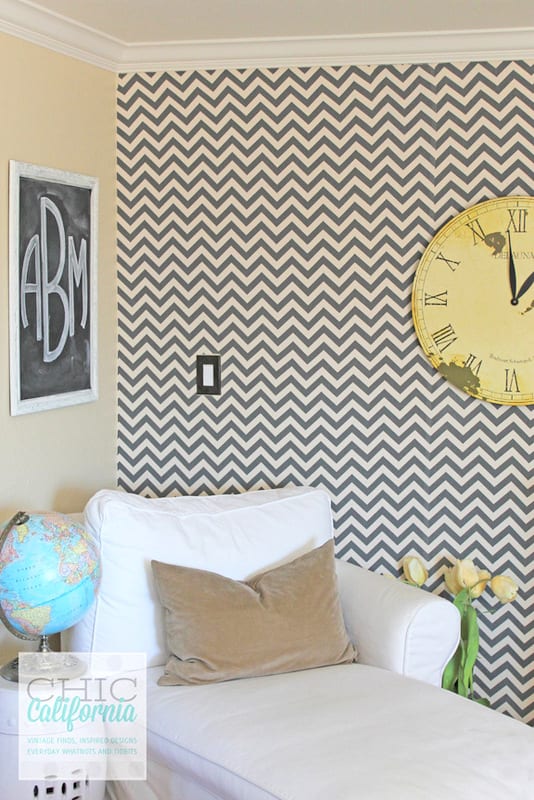
This ended up being a much easier project than I had anticipated. And it had a much bigger impact on the room than I ever thought possible. It took about 3 hours total. (There was a lunch break and a school pickup in between!)
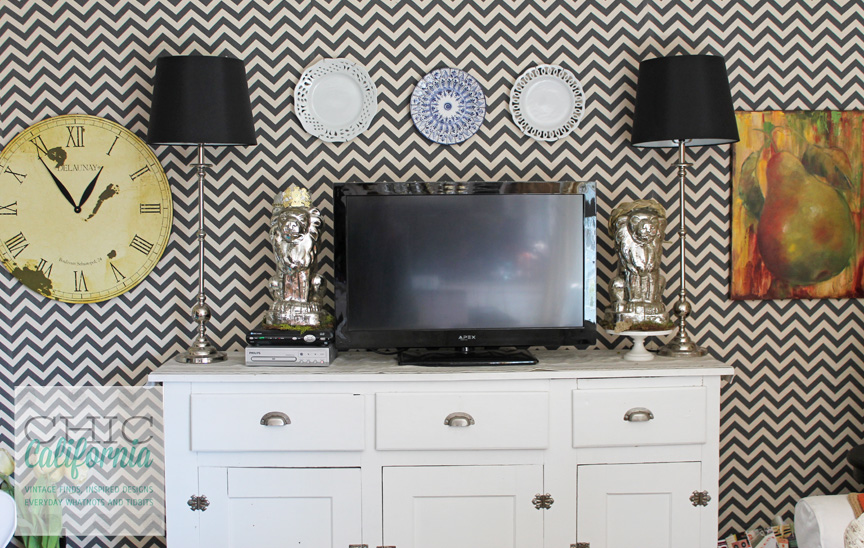
The results speak for themselves:
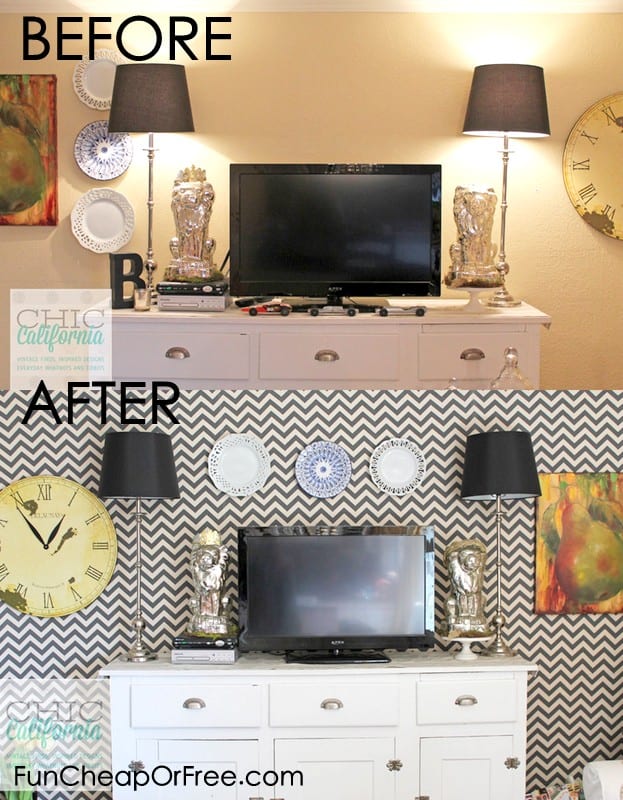
Amazing transformation, right??
If we ever move from this house this wall treatment will simply peel off. Then the wall will just need a wipe down to remove any starch residue. And the best part is the fabric can be reused. A toss in the washing machine and the fabric is good as new.


Here are a few things I would do differently next time:
1)Remove light plate and outlet covers first
2)Loosen moulding to put fabric under. It would have saved me from using my rotary cutter and I would not have had to be so even with my cutting. I could have just covered it with moulding.
3) Use a more forgiving fabric. I love the Chevron on my fabric but for a first timer it would have been a bit easier to use something that didn't have to be lined up so precisely.
When you get up close to my new chevron wall, you can see some imperfections. But I think that the Chevron fabric actually camouflages my mistakes and everything blends together.
I'm so happy with the result. It looks like wallpaper. It warms up my room and gives me the look I wanted without the commitment. Perfect for any renter or homeowner that wants a temporary and inexpensive solution to an ugly wall problem.
Give it a try for yourself!
A little about Chic California: I'm an Ohio girl transplanted to California and enjoying the California lifestyle. I love to write, craft, design and refurbish previously loved furniture. I love the style of California and I hope to share that with you. Chic California is all about sunshine, sand, and the outdoor lifestyle. It's a little bit Chic, a little bit Shabby, and little bit Surfer all rolled into one. I hope you stop by and say hi!
“oh my holy no way what the really whaaaa?” I think I just passed out from sheer excitement at how simple this looks!
There’s a wall in my foyer that will have fabric on it before the season changes!
Take pictures and send them to me, I want to see how it goes! XOXO
WOW!!! Seriously, wow! I’ve been a long time DRYer and I would never have thought to do this…but now that I know…let’s see, after my spring cleaning is finished, I’m going through my stash of fabric…thanks for the inspiration.
Let me know how it goes!
I really this idea but I was wondering do you have any suggestions on ways to hang stuff on the wall I don’t want a bunch of holes to fill when I need to move..thanks great idea.
We love command strips!
How do you know what the wall looks like after you remove it though?
So far people who have tried it say you just have to lightly sponge down your wall with water to remove the starch, and no one has complained about faded or peeling paint or anything! The beauty about walls is that they can always be repainted. But from my understanding, it won’t be needed.
I did this with a lightweight jeans fabric for my son’s room about 15 years ago, it went well in his beachy themed room. I just took it down about a year ago, as he is now 23! So it definitely works!
SERIOUSLY!??!?! That’s amazing that it lasts (and will come down after) that long! Thanks for sharing XOXO
You said that this peals right off when you’re done with it, but does it ever start pealing on its own and have to be redone before you’re ready to move? Does temperature change affect how the fabric sticks to the wall and how long it lasts?? I’m moving into a new place and really like this idea, but want to be sure to know what I’m up against first 🙂
I have a rental and this is something that I just have to try.
Please do, and let me know how it goes!
They taught us this in college (during an 8 week home ec course I took – silly science major!) and I never knew that it would really hold dense fabric! They called it a ‘pioneer’ trick. I will be doing this for sure! Thanks for the tutorial!
Haha Pioneer Trick. I like that!
I did this a couple months ago in our apartment kitchen with a BEAUTIFUL teal damask pattern. It only took 3 yards of fabric to do the backsplash and I didnt feel bad peeling it off a couple months later – it only cost about $9 and an hour of my time. I’ve told all my friends that they have to do it!
NO WAY!!! That’s so exciting, thanks for sharing!
This is amazing! Can’t wait to try it in our new rental house! But I do have to ask…WHERE did you get that TV stand? I’m in love!
This is a wonderful idea, I’m thinking about putting it up in our bedroom. I’ve been reading up quite a bit about it, though, and there have been a few comments that admit there was a little paint lifting upon removal, although it didn’t damage the wall, “touch -ups” would be required. In the home I live in, it wouldn’t be a problem, but as a landlady of a nice little house, I think I’d have to say “no” to the application, simply because over the years, I’ve had a lot of promises from tenants who don’t hold up their end of the bargain. I can see ME being the one who has to clean the starch off the walls, and as for “touch ups,” I’ve found that paint doesn’t always match any more even when it came from the same can after a year or so. I sympathize with the renters’ plight, wanting more color, etc, but after having to repaint entire rooms because touching up didn’t look good, or because the renters tried to repaint it themselves and it looked like a little kid did it, I’d have to say, I’m sorry, but you’re probably only going to live here a year, and the neutral color I have chosen is fine. They can add color in curtains using the rods I have hung.
Hi! What a wonderful wall- well done!! I’m wondering if you have any alternate ideas besides thumbtacks..? My painted walls are plaster- so there’s no option to push in pins, it’s too hard. Would poster putty work, maybe? Any other thoughts?
Thank you for the inspiration- I’ve been lamenting my sad, cream, rental walls for almost two years now!!
Thanks!
Amy
I have plaster walls as well, and can get pushpins in if I reeeeaaaally wiggle them! Otherwise I’d find a few buddies to hold the fabric while you spray, or go old school wallpaper, put the starch in a bucket, dip your fabric in, wipe it off, then apply to the wall in narrower strips than fabric usually comes. It means more steps, but no fighting with plaster walls.
I have textured walls… will it still work?
How textured? I would test it on a small spot first to see. It comes off easily so if it doesn’t work you can wash off the starch!
Walls need to be smooth, have done this technique for the past 40 years. It was all the rage in the 70’s, all the major designers were doing it….including ceilings!
im going to try this very soon…however my walls are not semi-gloss paint…they are matte/eggshell finish…will this affect the adhesion of the fabric?
Do you know if this will work on walls that have not been mudded or painted? They are just plain drywall right now.
I have no idea! I would imagine plain drywall wouldn’t be a good surface to work with. You could always do a small test square and see how it goes, though.
My fabric isn’t adhering to the wall in many sections including the sides. Any idea how to remedy? Thanks!
More starch!
Do you think this would work on a mirror? The space I’m moving to has a floor to ceiling mirror. I want to cover it up.
Good question! Not sure because glass is a completely different texture. But the beauty is it’s not permanent. Try it on a small mirror and test it out!
Once you starch the fabric to the wall and peel it off can you use that same fabric again?
I’m so excited to try this in our guest room! Husband hates the idea of wallpaper because “we” just removed a ton from our new home, but I can’t make myself paint 10 coats to cover the pink that’s in there now. Ha! Perfect solution to our remodel dilemma. Thanks!
Would this work on paneling? We are renting this house with SO MUCH paneling T_T
Do you have fabric suggestions. Im not a crafter but think I could really do this, I just have no idea about fabric. Does it have to be heavy? thick? What?
Thanks for the idea.
so i just put up my starch fabric wallpaper and i have some questions. was your fabric completely soaked? how long did it take to dry? did you use a fan to help it dry faster? so far it looks great and I’m super excited for the final dry look.
Have you tried removing it? Does the starch just wipe off?
Not sure, this was a guest post! But she said she was able to wipe down her walls and they were clean, because it was a rental she had to leave it as it was before she moved in!
What happens when you remove it? Does the starch just wipe off?
Thank you so much. I think I just found the perfect answer to covering some really ugly sliding closet doors. They have this awful 1980’s wallpaper on them and to take them down to paint, I would have to remove them along with the frame (some genius built the wall around the tracks or the tracks into the wall, either way-I’m not taking them down!). I’m on my way right now pickup some fabric and some starch. I’ve already hunted down my rotary cutter and double sided tape, since I can’t use push pins. Can’t wait to get started.
How has it stayed up? I’m in the process now because of your blog!
Do you think this will work over old wallpaper?
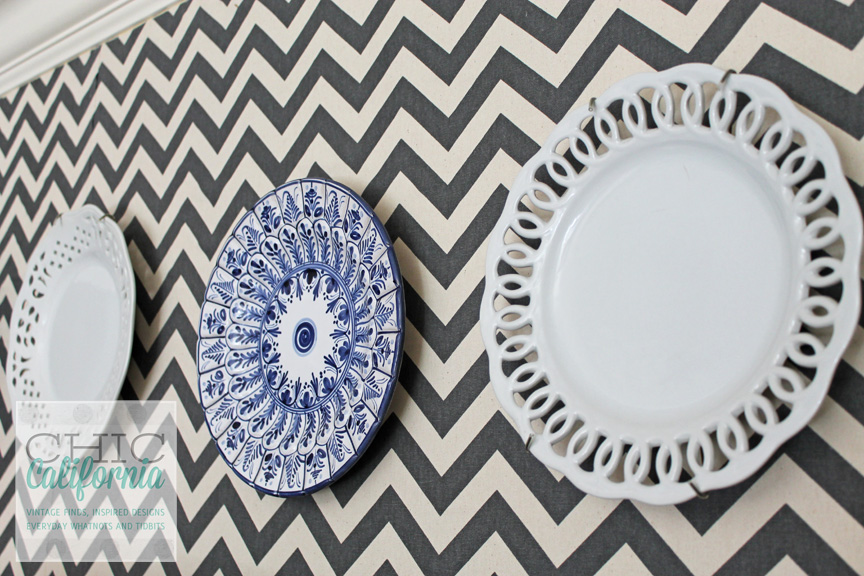
What did you use to hang pictures/plates? I plan to put fabric wallpaper like this on brick wall and can’t nail anything.
I’m a college student living in my first ever off campus apartment, my first step into adulthood! I saw my room for the first time and lets just say it needs some work. All four walls are covered from floor to ceiling with wood paneling. I love the idea of covering them up with this removable fabric wallpaper hack but was wondering if the fabric would stay on this type of smooth surface with grooves. I could fill in the grooves but I don’t want to do all that work if he fabric won’t stay. I’m also open to other suggestions as far as covering up these icky walls.
Hey! This is so amazing and I can not wait to try it! I was wondering if the material of the fabric matters, or which type of fabric would work best?
This is a really fun idea. I would give it a try, as I have been looking to cover walls in my living room for years, but have delayed because I am reluctant to splurge on wallpaper that will be wasted when I move houses.
Can you tell me what kind of fabric works best….cotton vs poly or Colton blend? Some fabrics have more stretch.
Do you know if this would work with a Wall that has texture?
Thank you for sharing. I too rent an apartment and it’s very difficult when there’s not much you can do to the wall. I’ve been wondering for so long about using a drop cloth or fabric against the wall and I wasn’t sure if that would work well, you just showed me it will work. I’m curious is this something you can do to the entire room or is it better just for an accent wall? So I’m going to use drop cloths and won’t be very expensive plus I already own various stencils. Including both large and small chevron. The only reason I asked about using more than just one wall is the room is the room is full of that old thick, grooved paneling. My only concern is the grooves in between the wood. So if I pull it taught the shouldn’t even touch that part of the wall and lay very flush. I’ll fought I’ll get all 3 bedrooms done, but i will start there.
I’m glad to hear that you want to try it out! I think that the number of walls that you put it on all depends on your tastes and the room’s walls. If you don’t like the paneling, then go for doing all 4 walls! You’ll go from having an old, outdated room to a room that is just your style! Good luck with it! You’ll have to let me know how it goes for you.
Would this work on a wall that has wood paneling ?
I’m not sure. but you could always try it out in a small test square to see! If it doesn’t work, just wash the starch off of the wall and you won’t have to worry about it being permanent.
Hello! I was wondering if this will work on really old wallpaper? Thank you!
I’m not sure, but it’s worth the try! Just try it on a small spot before doing the whole wall 🙂