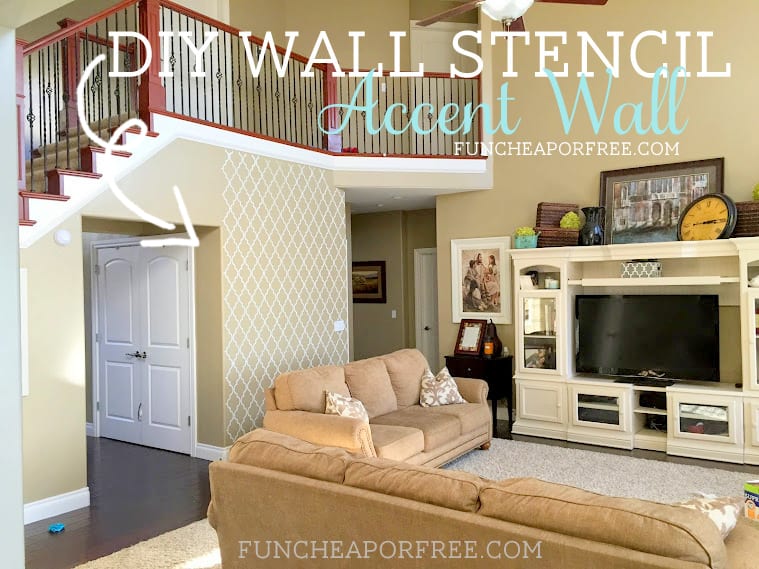
So…you know how I'm majorly nesting because baby girl is coming in 3 weeks or less? But you know how I am NOT much of a DIY gal and tend to break out in hives and have to breathe into a paper bag when I walk into a craft store? Thus, I've been focusing a lot on projects that make a BIG impact, with SMALL amounts of work/effort/brainpower/cost (like THIS and THIS)? Well, brace yourself…
I did a DIY quatrefoil wall stencil accent wall project last night that was seriously so simple even I somehow pulled it off! It's now the prettiest little accent wall. It makes me want to propose to it whenever I walk by. But that would be weird. And probably illegal. So I won't.
To be completely honest there's not much to it, so I'm not going to pretend to be a wall stencil genius or anything. But since so many of you went gaga over it on Instagram, I thought I'd take a minute to show you how I pulled it off (in less than 2 hours, mind you!). So here's my own DIY quatrefoil wall stencil tutorial for those who are interested! (And be sure to check out how I stenciled my kitchen HERE.)
Pssst…Enjoy the fun game of I-Spy while you're at it, since I don't believe in “Pinterest-perfect pictures” since it's not real life…and ain't nobody got time for that.
Quatrefoil Wall Stencil Accent Wall Tutorial:
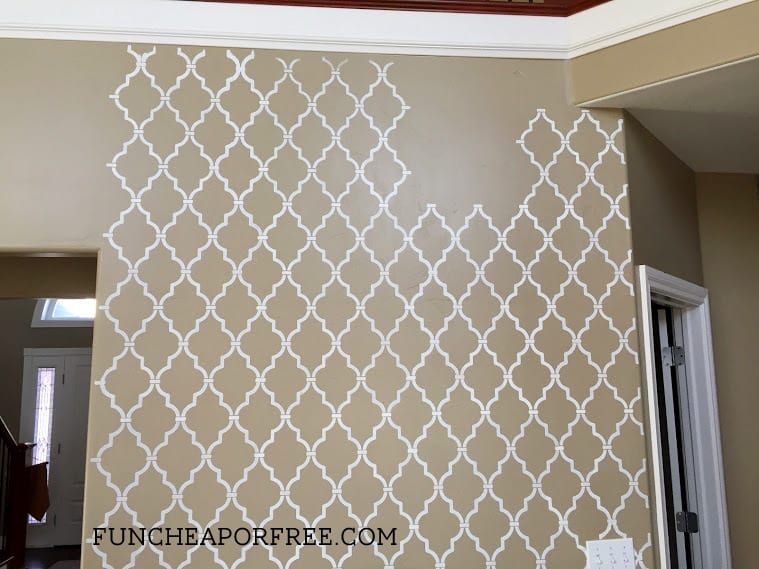
 I spy…an unfinished corner. Can you find it? Explanation on why it's unfinished below.
Here's what you need:
- Wall stencil – make sure it's a quality one! Trust me on this! I used this Casablanca Trellis stencil from Royal Design Studio and loooove it. It was thick and sturdy, so it laid flat and didn't move easily while I was painting, which cut back on bleeding exponentially.
- Paint (I used regular ol' white house paint
that we already had lying around in our garage)
- foam mini roller
- Painter's Tape
- Wet wipes, or disinfecting wipes
online that I think would've come in handy.
Here's how you do it:
If you want to hear from the pros, see how to stencil HERE. If you want my novice take on it, keep reading 🙂
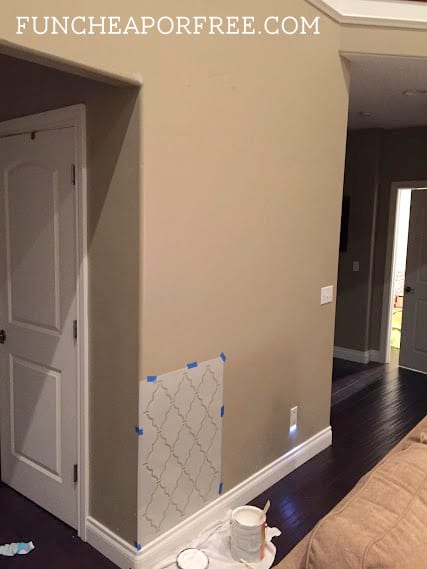
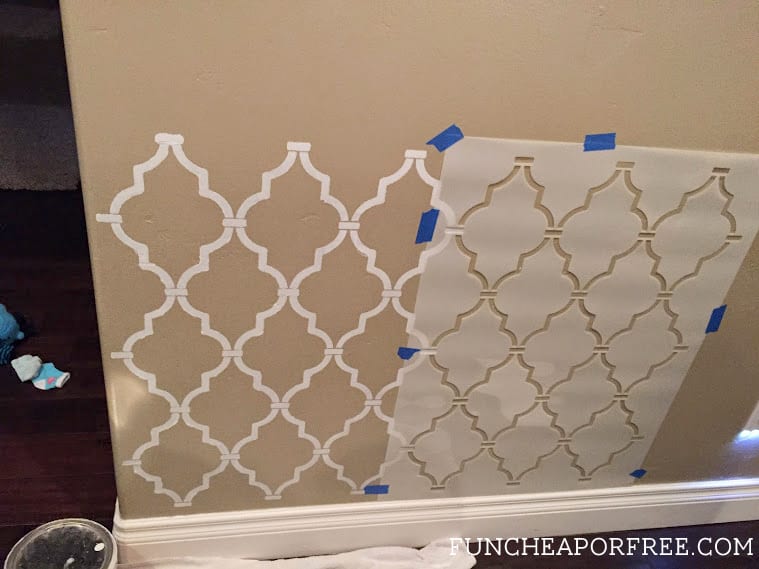
- Pick a starting point on your wall. I chose the bottom because I figured it would be the easiest to get lined up and keep straight (which ended up being the case).
- Tape the stencil in place with painter's tape. Make sure it's lined up carefully and tacked down well so it doesn't move! I lined it up with our baseboard which worked out nicely.
 I spy…a princess sock.
- Paint evenly over the stencil. Make sure to do a good, even coat of paint, but don't goop the paint on or it will bleed around the edges. You can always add more if you need to!
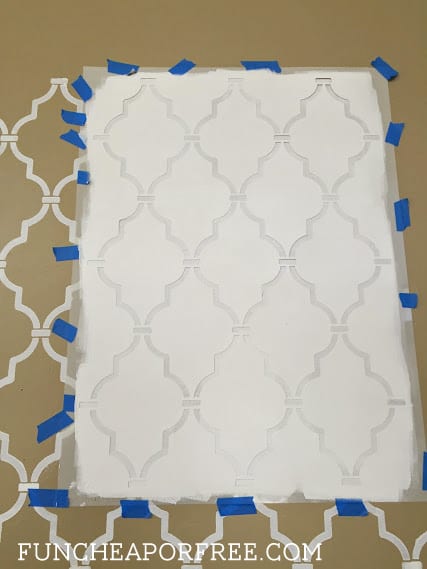
- I used a foam roller and am glad I did. It made it super quick and easy. Doing it by hand with a paintbrush or foam brush would have worked fine I'm sure, but it would've taken 4-5x as long. Tip: I learned to roll from the bottom UP, since I started with the bottom of the wall first. Starting from the bottom helped keep it straight, and keep it perfectly lined up with any existing stencil lines below/beside it. If you start at the top of your wall, do the opposite and roll from the top DOWN.
 I spy…an extremely staged picture, difficultly taken using a selfie pole
 for the first time, pretending to paint with my useless left hand from the top down which is the opposite of how you should actually do it. I have no idea how fashion bloggers do all this selfie stuff all the time.
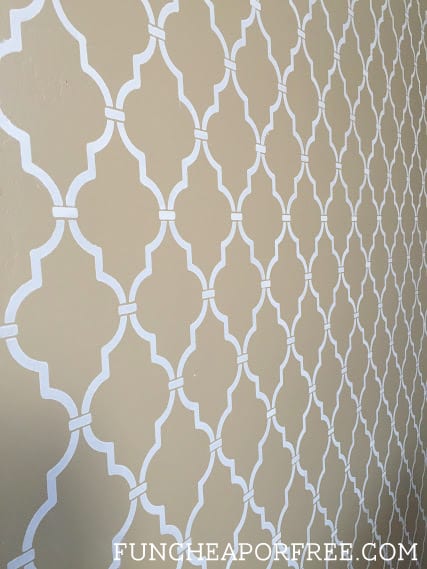
- Once painted, peel the stencil off right away.
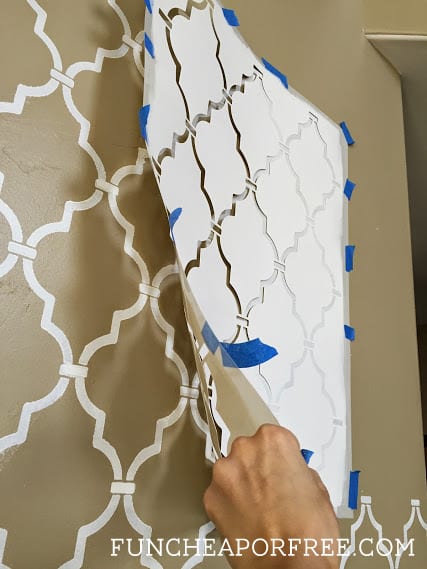
- Wipe away any smears or bleeding. I used my fingernail and a wipe to make clean lines here and there, but overall, I was beyond surprised at how little bleeding there was.
- Give the paint a few minutes to dry so it doesn't smear when it's time to do the next stencil. You only get one stencil and it has to be used over and over, so make sure there's no wet paint on the back before taping it down. It surprisingly doesn't take very long for the paint to dry. I turned the ceiling fan on to help.
- Line up the next stencil carefully using existing stencil lines. This particular stencil was super easy to line up because of the “dash” at the top, sides, and bottom of the design.
 I spy…even more socks. They seem to multiply around here.
- Tape it down, paint, and repeat! That's it!
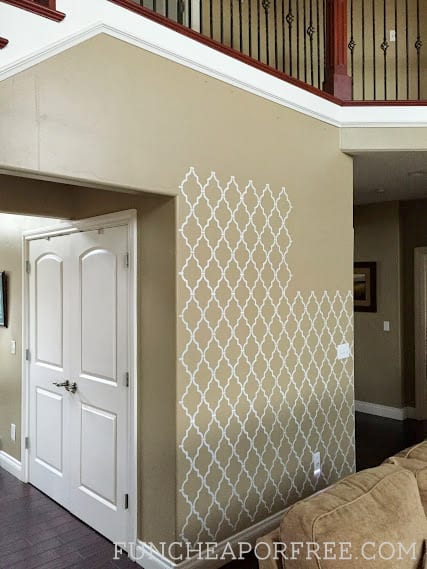
I turned on The Voice on my DVR and went at it…then I got tired and bored after an hour and decided to call it a night. What can I say, my heartburn and braxton hicks were killing me. But this is how far I got, which is not bad progress for one hour, being 36 weeks pregnant right?? Just shows how easy it was.
After recharging my batteries I finished the project the next day while my kids were napping.
 I spy…a cushion that is upside down, most likely done on purpose to hide a stain.
The toughest part was the very top row. That wall is TALL! I'm 5'9 and had to pull up a tall kitchen chair to reach, painting over my head while holding the stencil down as best I could using my selfie pole (lucky I had it lying around, eh?). Yes, it was as comical-looking as it sounds.
I went slightly out of order at the end because of that awkward little hangover part of the ceiling.
But I finally got it figured out well enough.
Why the unfinished corner?
 I spy…a blue silk hair flower, a red cup, PJ's left out from the morning school scramble, and someone who woke up from their nap and tried to sneakily watch what I was doing.
There was no way to line up the stencil nicely with the white molding on the top like I could with the moulding on bottom row, because of how the stencil design lined up with the existing stencil marks. The molding hit right in the middle of the stencil making it really hard to tape down and keep flat while trying to paint over my head.
I did my best, but ultimately if you look closely you'll see an unfinished corner where I simply couldn't get the stencil to lay flat. The top row of stencils needs to be touched up by hand because I could barely reach it with the paint roller. I decided I'll let my hubby grab the tall ladder and finish that part so I don't crash to my death in the process (I'm ultra clumsy when pregnant!).
 I spy…a major reflection from my tallest window, making it hard to even see the photo collage wall in the “before” pic, but it's the only pic I could find because I failed to remember to take a real “before” pic. Oops.
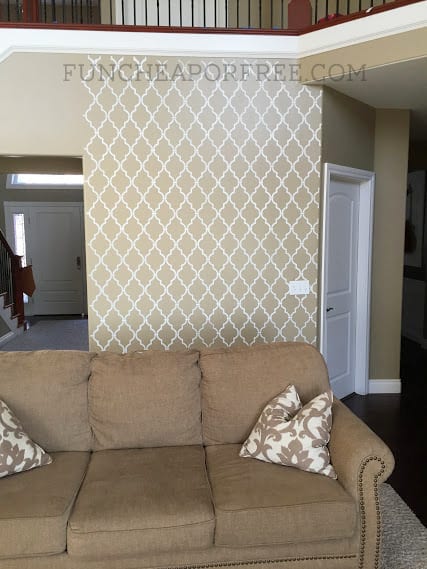
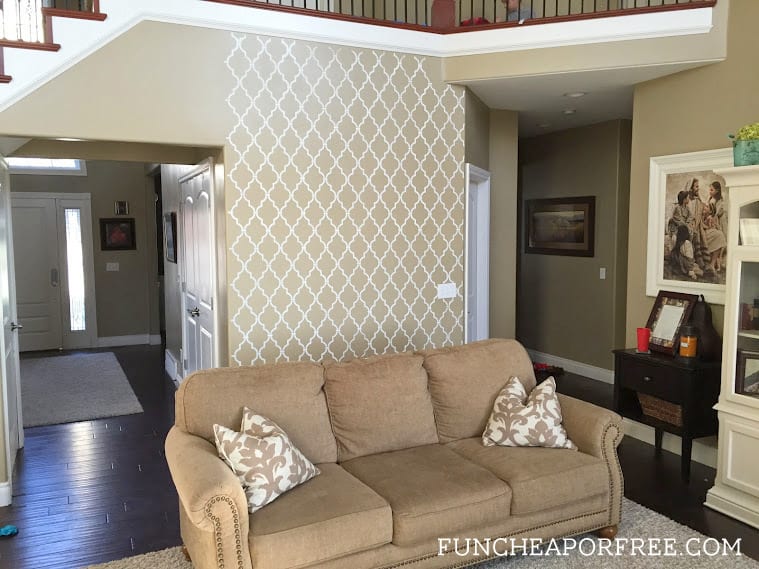
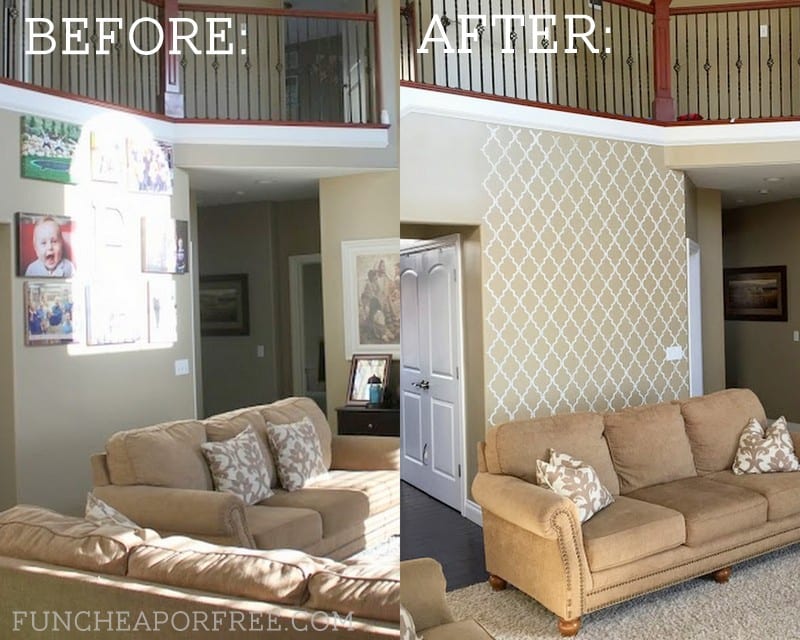
I am SO HAPPY with how this wall turned out! This has been an awkward wall that we haven't known what to do with for years. It started out as a modge-podge photo collage wall:
 I spy…mostly empty picture frames that were never filled because of pure laziness and indecisiveness.
It then morphed into a photo canvas wall:
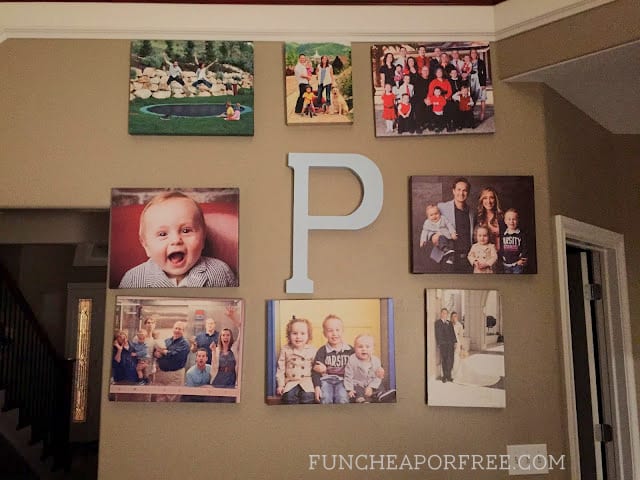 I spy…unbalanced and crooked canvases because we tried to use existing nail holes and nails because of my decor commitment issues…then we got used to it and failed to ever take them down and line them up properly.
The plan now is to get updated family pics once the baby is born and continue with the canvas collage wall idea. Only this time we promise to line them up straight and make new nail holes if needs be. Cross my heart. Brownie girl finger salute thing.

So what do you think? Do you like it? Would you leave it plain or hang photos over the stenciling? Is this a project you would do? Leave a comment and share!
Love y'all –

Beautiful! I have the same stencil on my entryway but I used a pearl paint so it is kind of iridescent. I’m planning on making a picture wall and hanging all different size photos of the family on there. I have a similar background color also. Love quaterfoil. I did one wall in my bedroom also….I need to control myself. As for the empty picture fame dilemma….I am guilty of that also, we have one of those large multiple picture frames hanging in the bedroom with about 15 slots, I only have about 8 filled, the rest are of fake wedding and family pictures, my husband always jokes that that’s his “other” family.
I used that same pearl paint in my kitchen, it’s fun! Thanks for sharing 🙂
I love it! The only thing I would suggest is doing the small area to the left as well. It looks slightly incomplete to me. But yes love the design and the collage idea. Very nice esp being 36 weeks pregnant!
Yes! Forgot to mention that as well, thanks for the reminder!
Looks great! Forget nails and hang everything with 3M strips for photos. Game changer for my marriage. If I dont love it, my husband pops it off and replaces it in seconds with the strips!
GENIUS!!! I’m putting those on my shopping list asap, i love that idea!
Jordan! Your stencil looks amazing! I can’t believe you’re getting so much done right before your next baby is due 🙂 I was curious what your living room wall color is? I’ve been looking for a warm/khaki/beige/type main room color. I have vaulted ceilings too and would love to have a color that I can use that gives me lots of room to play with other colors, patterns, and accents.
Ugh I wish I knew what the color was! It was a short sale so we moved in as-is and don’t have much. I’ll look around the garage to see if I can find the right can, maybe it will have a code or name or something!
I love it; it really livens up the space. I agree with Keisha about filling in the small space to the left to finish the look. I am new to your site and am really enjoying your posts!
I think canvases would look great on top of the pattern! What a fun wall. I love your wall color and the white moulding and paint looks fresh!
What color are your walls through out the house?
I wish I knew! They are a light tan color. The walls were painted when we moved in, and we have no idea what the color is (it was a short-sale). Let’s hope we don’t need to repaint any time soon! :S
That’s great! I found a very similar pattern at home depot for less than $20! That’s half of what this particular stencil costs, just sayin.
Good to know, thanks!!
Thanks for your helpful article.
You’re welcome! I’m glad you liked it.
I only kept reading because I loved it so much! I originally just wanted to look at the picture 😅 I just thought you’d like to know so much I am writing the first comment I’ve ever done on a blog 🤩
Awww, thanks!!! 🙂