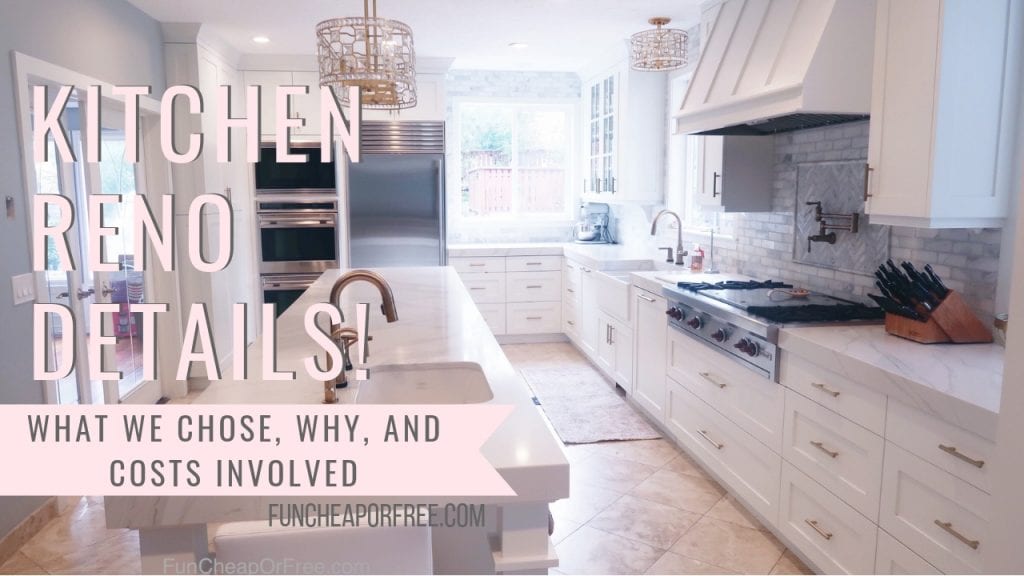
Alright, alright, alright, it's been long enough. You have asked and waited oh-so-patiently, so now it's time to share all the details about our massive kitchen renovation! I shared the progress for months on Instagram, but I promised to give you the FULL low-down dish on everything.
However…I still hesitated in writing this post.
Truth be told, this was a big, huge, pretty darn expensive renovation. It was not DIY, it wasn't “hack-y” or scrappy, and it certainly wasn't “cheap”. I worried about sharing so many details about a project like this for a number of reasons. “Will people think we are trying to brag?” “Will it be annoying to my Freebs?” “Will it put a wedge between me and people who are in their F.D (Financial Disaster) or who are in a tight financial situation, and cause them look at a project like this as something that makes me less relatable to them?”
Lots of questions and insecurities to work through, if I'm being totally honest.
But…at the end of the day, I'm your Richard Simmons. I've been there. I lost the “weight”, and now I'm your eternal financial cheerleader! I am more than happy to share this with you, because I'm not ashamed! Heck, I'll even tell you what we spent and what things cost, because I'm dang proud that we saved up enough to pay cash for everything! It was friggin' hard work, by gee golly! We wake up every morning so grateful that we took the time to save up and do it right.
*Note: When you click the links in this post, we may receive a commission at no extra cost to you.
As you may or may not know, we spent years scraping by. Living off of credit cards. Unsure of what our paycheck would be, or if we'd have enough to cover our bills. Self-employed, unsure of our future. Raising a young family and trying to live a good life on a very tight budget. We've been there! We are still there in many ways!
Here's what I can tell you. The budgeting and financial principles Bubba and I have created, tried, tested, and continue to live by every single day…WORK.
And they work WELL.
And they work FAST if you are dedicated and hit it HARD.
We are out of our F.D. We are on solid ground. We don't have debt any more. At all. We aren't afraid of bills any more. Heck, we aren't afraid of paychecks any more! We haven't won the lottery, we aren't billionaires, and no one has ever gifted us any form of money. We are average, down-home folks without any special privileges or circumstances, just like anyone else.
But…we live, breathe, eat, and SWEAR BY the financial principles we teach every day on this blog, social media, and in Budget Boot Camp. And we hope that a project like this is proof that anything is possible! We had to wait a really long time to redo a kitchen. In fact, this is our first major home project we have ever done (aside from paint and carpet)…and we've been married 11 years! It took several years of saving up, and even longer before then of saying “no” to new furniture, eating out as much as I'd like, even vacations that came up, all so we could put in our dream kitchen, and do it exactly how we wanted it.
So here I am. Keeping my promise of sharing every detail with you in hopes that it somehow INSPIRES you – not deters you – from sharing in this joy with us. Maybe it isn't a kitchen for you. Maybe it's continuing education. Or buying a home. Or starting a family. Or starting a business. Whatever your financial goal or dream is, just know that with hard work and delayed gratification, it CAN HAPPEN for you!
With all of that being said, are you ready to dive right in??
Today I'm sharing all about our renovation – the products we used, what we splurged and what we saved on, why we chose what we did, and I will even link to all the furniture and lighting we chose! As a reminder, not a single stitch of this kitchen was sponsored in any way. We saved up and paid for 100% of it ourselves, so you best believe we did our research before investing in everything we chose!
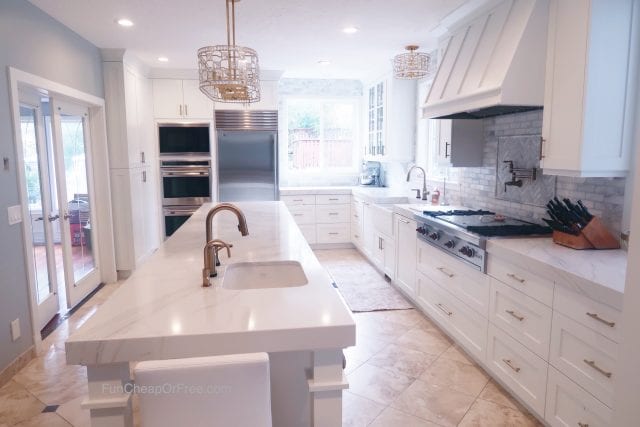
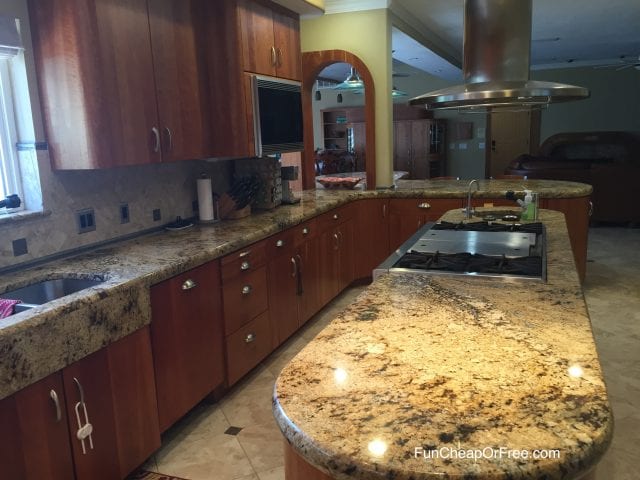
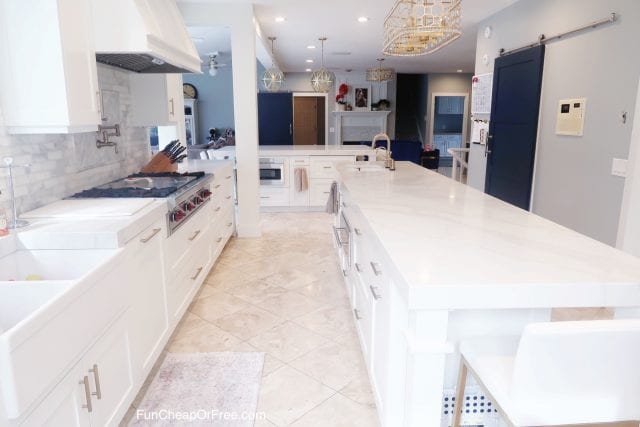
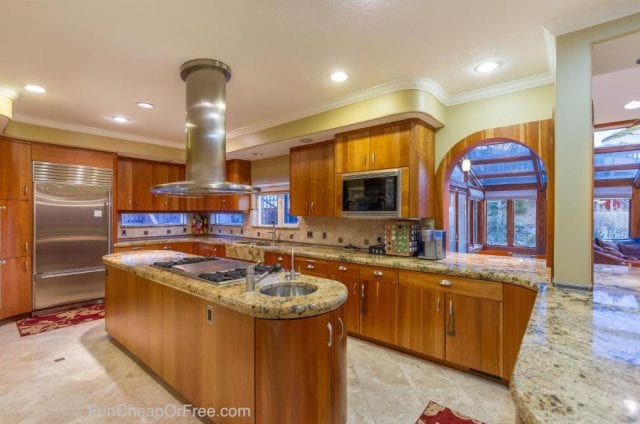
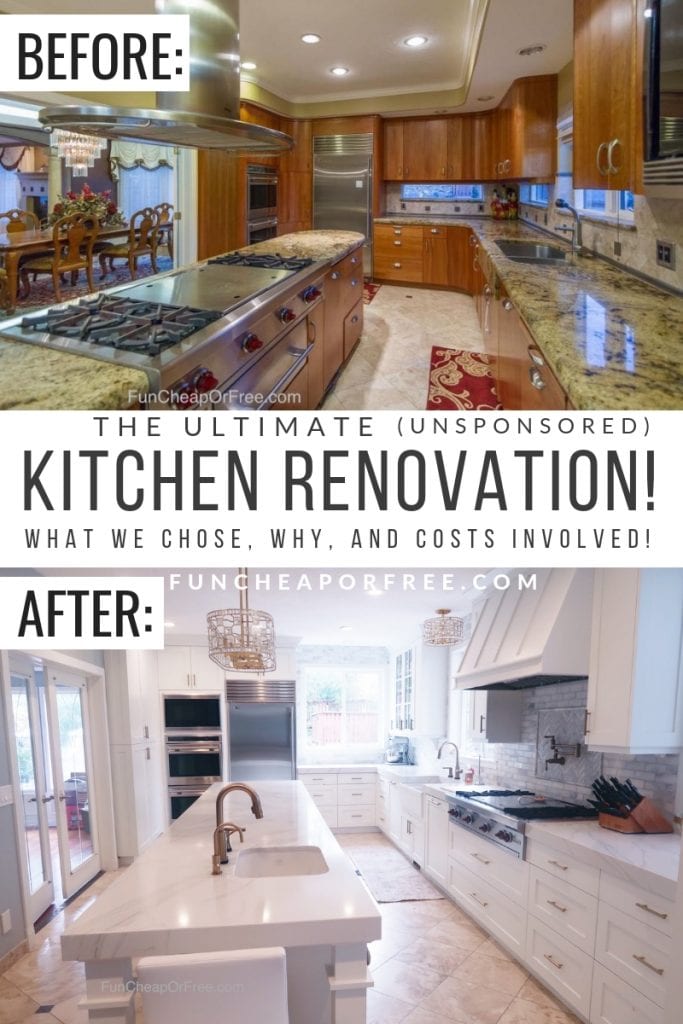
First up, some before and after shots. Kind of hard to believe, right??
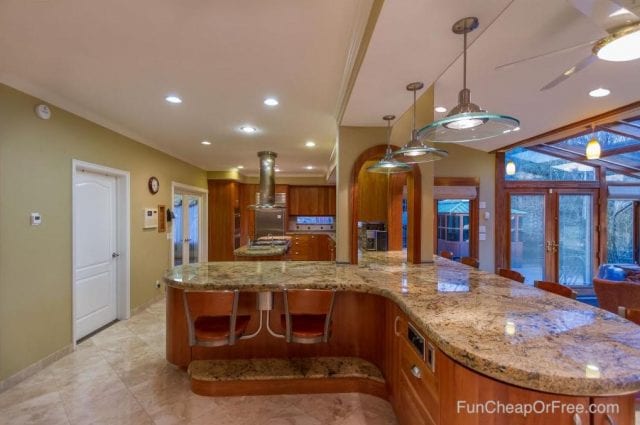
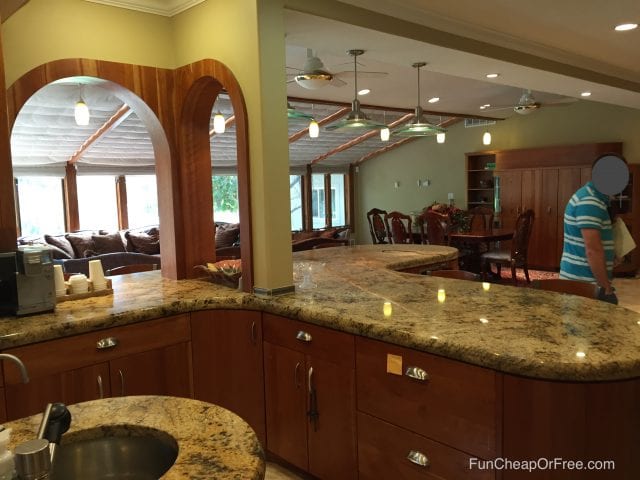
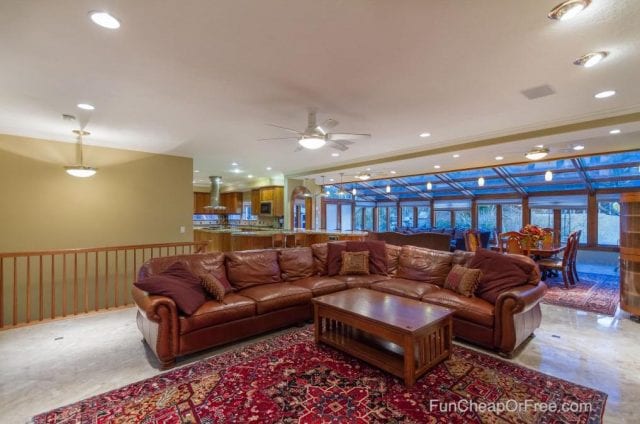
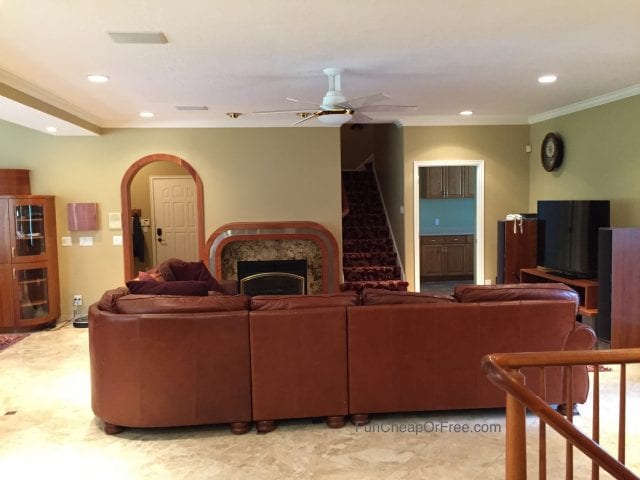

And lastly, the dining room. Unfortunately we didn't get many “before” pictures of the room before we ripped down the curtains and painted, but this will give you a decent idea of what we were working with before! (And no, none of the before shots were edited or darkened in any way shape or form. Now you know why we called it the Haunted Mansion.)

Whoa. Does anyone need a chocolate bar and a nap after those before pictures? Pretty astounding, right?
Next up, a video tour of the new kitchen!
Watch the video online HERE or watch it below:
So there you go! That's the quick overview of our kitchen renovation project!
Now as promised, I have loads of additional details for you about…well…everything! First up…the back story.
Duh, duh, duuuuuhn!

- If you're curious about the details of our house, how we snagged it, afforded it, and why we still wake up, even 2.5 years later, just about near tears with gratitude…watch this video:
(Watch it online HERE or click watch below)
- To see progress of our renovation, click HERE and check out the insane chaos that comes with renovating, ha! *eye twitch*
So now that you have some back-story, let's hit up some of your questions submitted online!

GENERAL Q&A:
On Instagram and Facebook I asked for your kitchen reno questions. Here's what isn't covered in other parts of this post and video:
- “How do you keep all that white so clean??” A very common question! The answer is…I think white is way easier to keep clean than some other colors! We use magic erasers and my favorite Ecloth microfiber disinfecting cloth (use the code SPRINGFREEBS for 10% off!) and everything stays really clean. We have had dark sinks and dark cabinets before, and had black chairs in our last kitchen. We thought it would hide things but I felt like every fingerprint, crumb, and smudge showed. So we actually find that white to be fairly low-maintenance!
- Yes, we paid for 100% of it ourselves. As mentioned above, none of it was sponsored in any way shape or form.
- We hired out 100% of the kitchen. We didn't do any of it ourselves. We waited almost one year longer than originally planned to give us more time to save up, because we wanted to hire everything out to professionals and for us, it was worth the added cost. We are NOT “DIY-ers” and have zero experience, and we hate home projects, frankly. Ha! So we are so super happy that we hired everything out. That's just us, though! We could have saved a TON of money had we done the labor ourselves. It's just not our jam, unfortunately.
- We found some other ways to be scrappy, though. We got multiple bids on everything and found fair deals on everything. We also sold the old cabinets and got $2,000 out of them! They were solid Brazilian cherry and made someone extremely happy. That alone covered the cost of both our dishwashers! Woo hoo! We also sold the old bar stools and old furniture. We ended up keeping the main slab of granite from the island and are planning to use it for an outdoor kitchen someday.
- When it comes to the overall total cost of the project, there are lots of factors that are resulting in our not sharing one overall total amount. This is mostly because the project ended up seeping into other rooms of our house, including the basement, and exterior of our home, as we decided to expand into different projects while everything was already torn up. As a result, we don't have an accurate number that represents the isolated cost of the kitchen renovation in and of itself. However, in this post I share the individual costs of almost everything in our renovation so you can get a feel for what a project like this might cost you…so keep reading!
- We started saving up for it before we even moved in (which was Spring of 2016). We started the renovation in September 2017.
- We paid cash for everything as we went. We didn't want to take out a loan or take money out of our house for any of the projects, so we saved up to pay cash as we went for everything. To maximize the benefits, we would pay for as much as we could with a credit card (as long as they didn't charge us an extra fee for paying with a card) and then just paid it off next day. That way we got credit card points without going into debt.
- Yes, we used a designer to help us. It was a complicated renovation; we had to move gas lines, electrical, cut into the exterior of our house to put in one window and expand another, and had some structural walls to work around. Not to mention we have never renovated anything before, and we are NOT designers. We were in way over our heads! So we hired an architect/designer to help us with the main design elements of the kitchen. In terms of lighting, paint colors, finishings and such, it was really nice to have someone with a professional design eye to bounce my ideas off of, and she helped me narrow down my choices; but in the end everything we chose was our own decision. I DEFINITELY recommend hiring a professional to help if you are like us and have absolutely no clue about home renovation projects. This was a big one that ended up being fairly complicated (hashtag: old house probs) so, while it hurt to write the check (she charged $120/hr! ouch!) it was worth the investment to have her expertise on this project. We factored the cost of using a designer into our project budget and paid for her hours as we went, rather than paying one big lump sum at the end of the project.
- The project took about 100 days from demo day to the day we were able to start using the kitchen again. That was around January. But the project ultimately trickled slowly to a stop over the next few months between our sunroom cabinets, the barn doors, paint touch-ups, lighting, furniture, and other finishing touches. But the bulk of the project was done in 3-3.5 months.
- “What would we have done differently?” This was the #1 question we were asked on social media. Honestly…nothing! So far, we have been 100% happy with all of our choices! We really went slow and took our time, so by the time we went for it, we knew just what we wanted. Even the minor annoyances like the touch soap dispenser isn't a big deal, and I don't regret putting it in.
Now, time for overall kitchen details:

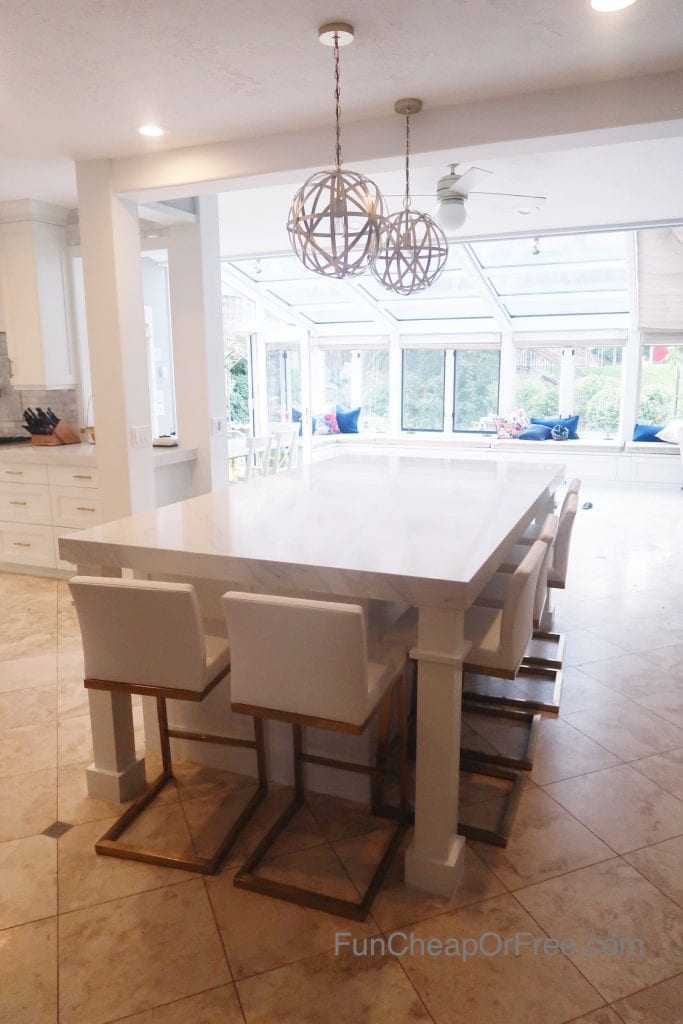
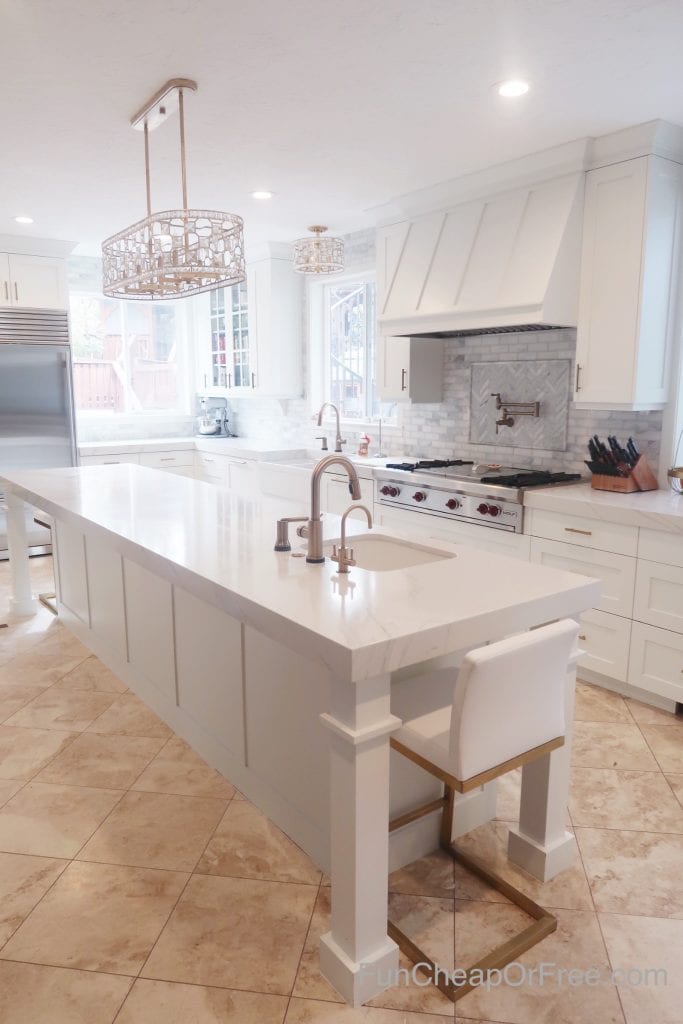
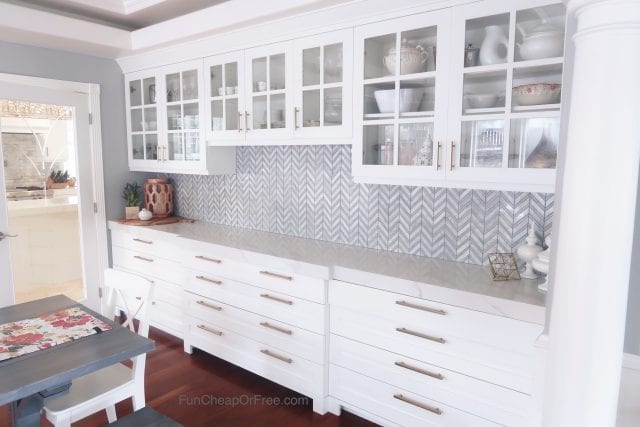
COUNTER TOPS:
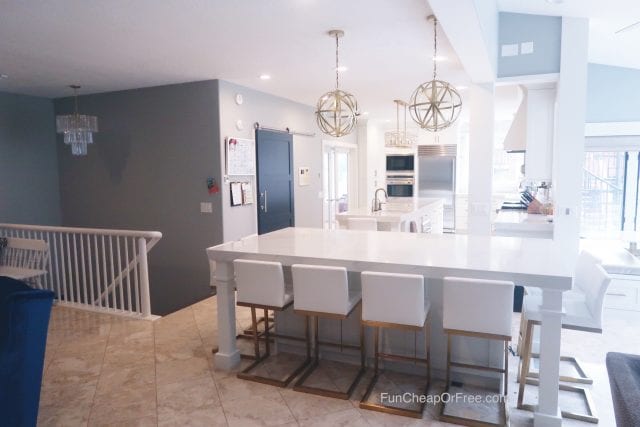
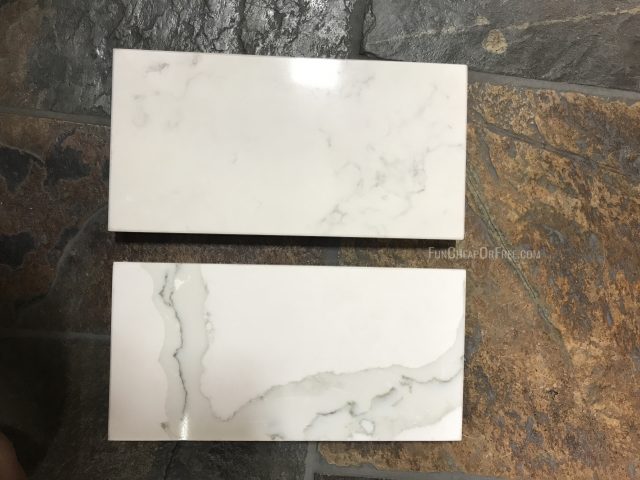
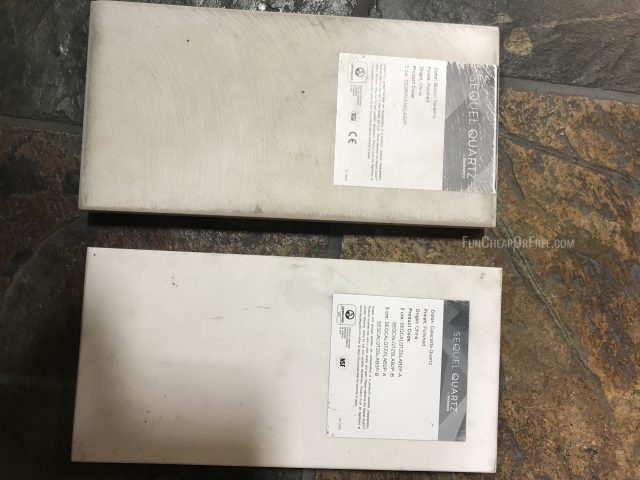
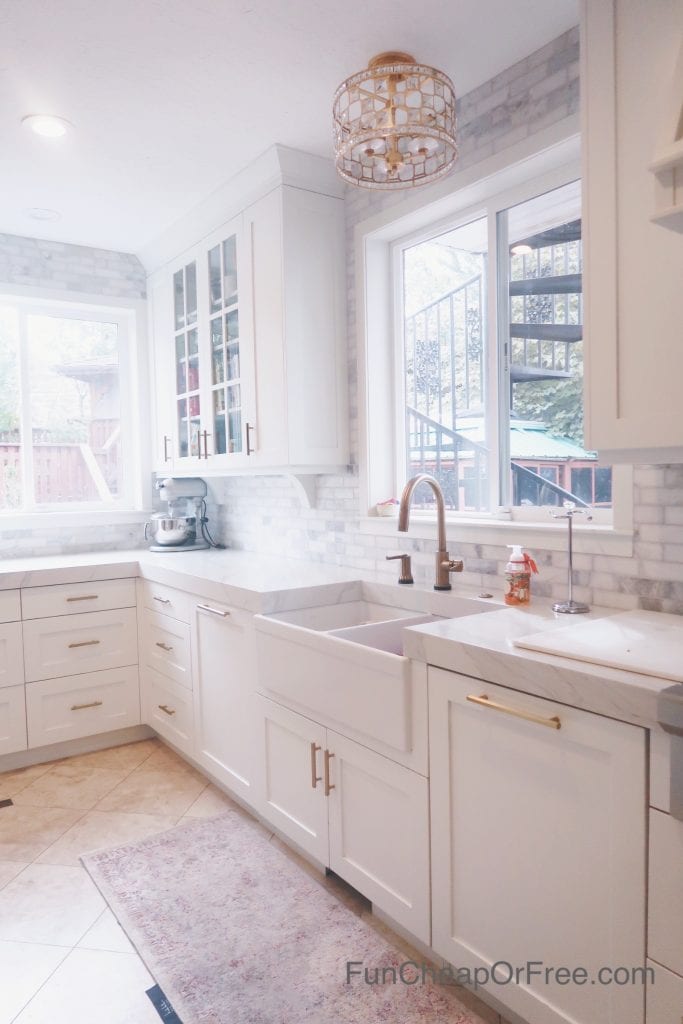
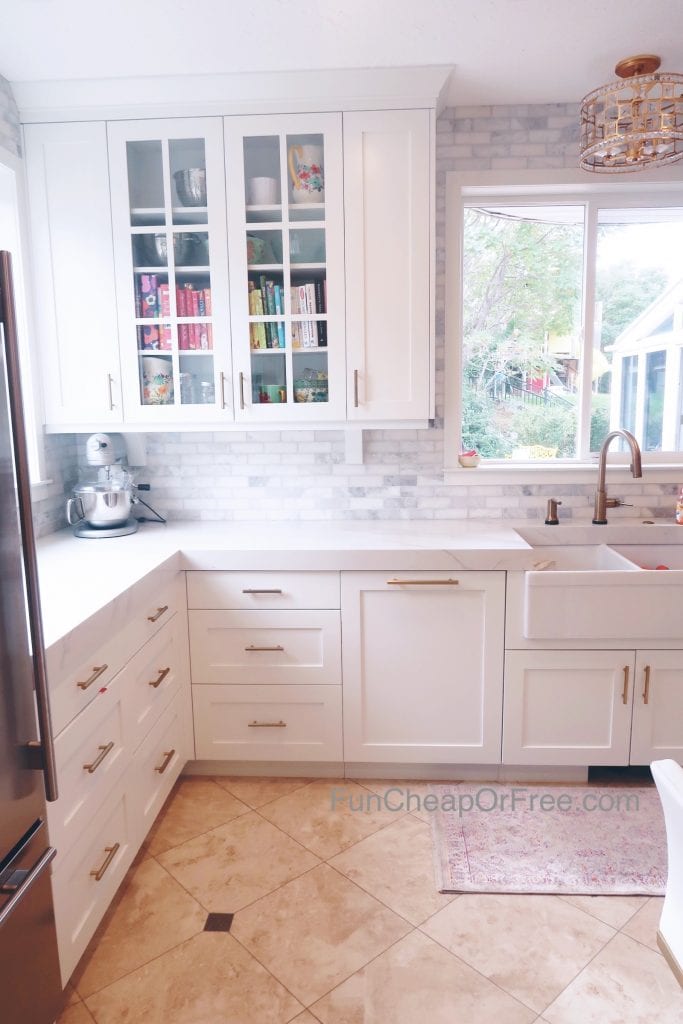
After much research, we went with Quartz counter tops. We wanted our counter tops to be pure white, and I wanted VERY little grain…but still wanted them to look marbled. We decided on quartz and I am SO HAPPY WITH OUR DECISION! I absolutely LOVE our counter tops!
In the main kitchen and in the formal dining area we went with “Calcatta” white quartz, and on our desk area we went with “Bianco Venatino” quartz. We love the Calcatta especially, because it has the look and grain of Carrera marble without all the fussiness! (Our floors are marble and I wouldn't wish it on our worst enemy. Ever. For as long as I live.) They have been extremely easy to clean, even when Mory somehow gets ahold of a sharpie and draws on them *face palm*. We simply used a magic eraser and BOOM. Good as new. The only downside to quartz as far as I've experienced is that since it's not a natural stone, you can't put hot pans directly on the counter or you run the risk of turning it yellow, or cracking the counter. We just use cutting boards, towels, and hot pads, and haven't had a problem. (I'm pretty OCD about it and have even trained all of our babysitters not to set hot pots on the counter. So far no casualties! Knock on wood!).
I seriously love love love love love our counters.
Here is the Bianco quartz:

Here is the Bianco next to the Calcatta:
CABINETS:
Warning…you might get sticker-shock after reading this section. Cabinets are typically the most expensive part of any kitchen renovation, and ours was no exception. We have a LOT of cabinetry in our spaces, and wanted sturdy, top-notch materials that would stand the test of time. So keep in mind that our cost and budgets might be VERY different than your renovation projects, and take it for what it's worth – me being open about OUR project and budget, and what we saved up for! Ok, carry on 🙂
At first we considered keeping our original cabinets, and simply painting them white and replacing the hardware. But there were so many things we didn't like about the original cabinets including the fact that the fronts were flush (no dimension!), the end and corner cabinets were curved (yeah, it's as weird as it sounds), and there were hardly any drawers. But…sheesh…cabinets cost so much! What to do…
After much research and the opinion of our architect/designer, we decided to start from scratch. She explained that it would cost us so much to get the cabinets how we wanted them…and even then, some had to be replaced and would never fully match the old, irreparable ones…it just wasn't worth the hassle or cost. We just kept saying “if we are going to do this, we are going to do it ONCE, and we are going to do it RIGHT.” As mentioned above we sold the old cabinets and barstools, which made someone very happy. It made us very happy too.
We went with “paint grade”, so they are poplar wood cabinets, painted white, with slow-close functions on all the drawers and cabinets (which is a must-have for us! We love the slow-close!). The kitchen cabinets cost $23,800. Since I know many of you Utahns will ask, the cabinet company we used was Summit Cabinet Inc. They don't even have a website or anything, and he's so backed up on work (over 6-9 months he said!) that he said not to even share his name or number. But I wouldn't leave my Freebs high and dry like that…so let's just hope he doesn't get mad at me for sending him more business, haha. I gochu, boo.
I canNOT tell you how satisfied we are with our cabinets. We originally set a $30K budget for cabinets, and *hoped* that maybe we'd have enough budget to be able to do the homework desk area and the formal dining room build-ins. After getting several bids that were depressingly high (like $40K+ for just the kitchen…), Travis with summit came in right around our budget, but that was for ALL 3 PROJECTS!!! We couldn't believe it! He was so booked out we had to wait an extra 3-4 months before we could start the project, but it was well worth the wait for the savings we got. Not only was his price good, but he was on time to the DAY he said he'd be done, and his work is impeccable. I can't say enough good things about him.
FLOORS:
We ended up keeping the original marble tile floors, much to my dismay. I reeeeeeeeeally wanted to replace them (I wanted tile that looks like wood) but Bubba pulled the practicality card on that one. It would have nearly doubled the cost of our project, and we would have been committed to changing the flooring on almost the entire main floor since our floor plan is so open and there's no natural “seam” to start or stop kitchen flooring. Thus, we opted to keep the original floors.
Why do I hate strongly dislike our floors? Three words…
They. Are. MARBLE.
Don't get me wrong, marble is gorgeous. Luxurious. Modern, classic, all of it. But…
It's also one of the highest-maintenance materials on the planet. In my opinion, it has no business being on the floor in a home where humans live. Let alone little tiny humans that drop things, spill things, and wear roller blades in the house when you aren't looking. Marble stains easily, you can't use normal cleaners on them, and it scratches so easily that even our socks scratch up the floors and keep it from looking shiny and new.
Not to mention, it's super expensive to get marble looking like new again. We had a bid for someone to come buff and seal our floors (which we should be doing at least 1-2x per year apparently). It was going to cost…wait for it…$2,500. TWENTYFIVEHUNDREDDOLLARS! I nearly passed out. Needless to say, we live with the scratches and stains and will figure it out when our kids are out of the house.
So there you go. I'll get off my soapbox now, but in case you were ever curious about the matter, I DO NOT recommend marble. (Gee, why don't you tell us how you really feel, Jordan?)
Oh…and in case anyone was curious about my opinion on wood floors…I'll never do them again. Half our main floor is wood in this house, and 75% of our flooring was wood in our last house. Ugh. It's nearly as bad as marble. Our dogs nails scratch it, it warps with spills that aren't cleaned up in time, they always look dirty, the list goes on and on. They are gorgeous! And I bet there are types and colors of wood that are better than what we have/had. But for me, I like tile and Pergo-type flooring that is indestructible!
PAINT:
We hired painters to do our paint. We used American Town Painting, the same company we used to paint when we first moved in. They are great! Tell Gabriel hi for me if you call :). We used Coventry Gray (Benjamin Moore) in the kitchen and dining room. The navy blue color we used is Deep Royal (also Benjamin Moore).
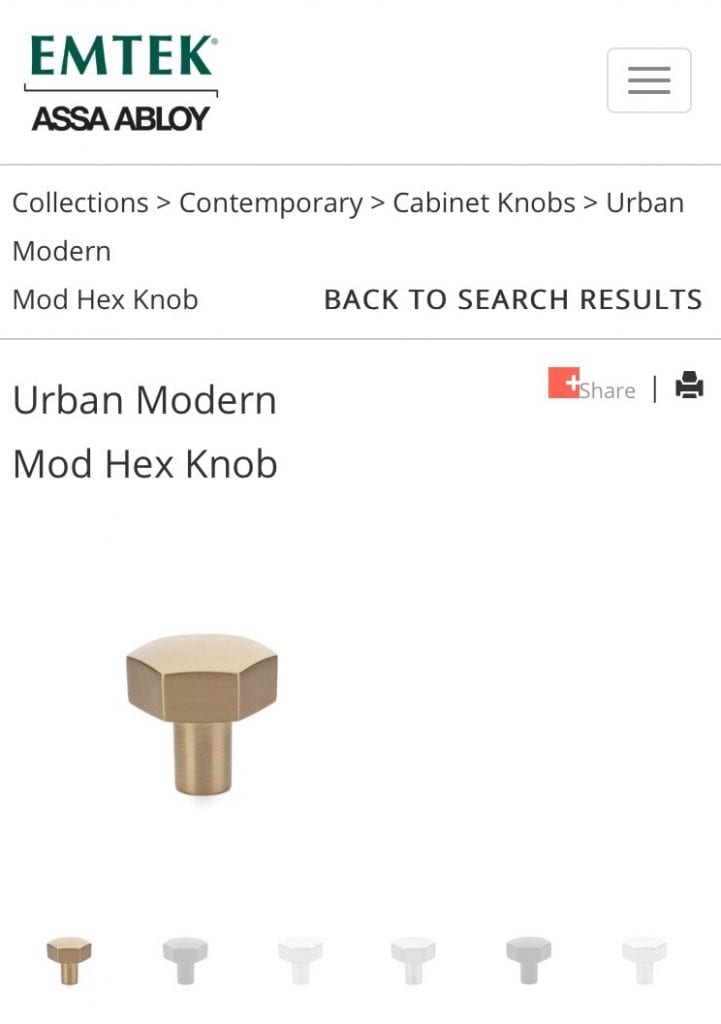
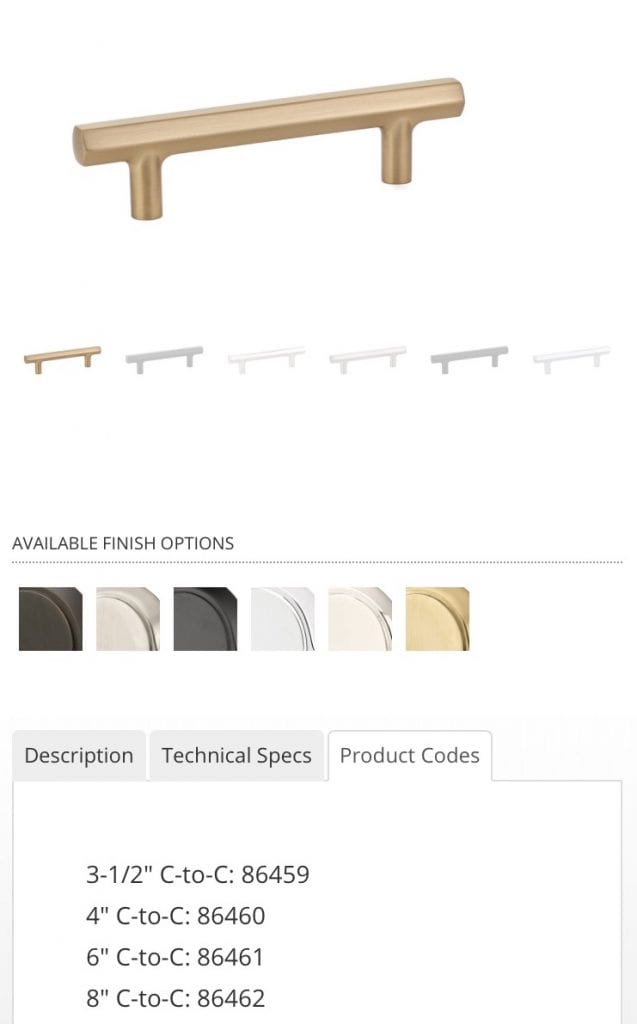
DRAWER PULLS:
I LOVE our drawer pulls. The brand is Emtek and it's called the “Urban Modern Mod Hex Knob”. Truth be told, they were a bit of a splurge. We went non high-end on certain things (like lighting, for example, since you never touch or mess with it…), but for me, I wanted REALLY sturdy, solid, top-of-the-line drawer pulls. These babies weren't cheap (I can't remember the exact cost each but I want to say $10-$12 for the big ones), but they are super solid, and they were the perfect color of gold (also something I was picky about – I didn't want them too brassy, and didn't want the gold to rub off in time). For us we had a big “hardware allowance” from our cabinet maker which covered much of the cost of the handles (alleluia!).
Side note: If you buy any of these things online, SIGN UP FOR EBATES FIRST!! You can get cash back on your purchases (free to you!) which really really adds up on a project like this! Sign up HERE and you get $10 free when you spend your first $25 shopping online. It's a no brainer, guys.
Ok, now time to go through everything talked about in the video! Starting with…the “KID ZONE”, as we call it.

In terms of functionality, we divided our kitchen into “zones” to make it as efficient and organized as possible. The “Kid Zone” is where our kids make and eat most of their meals, so everything we designed in this area is with our kids in mind.
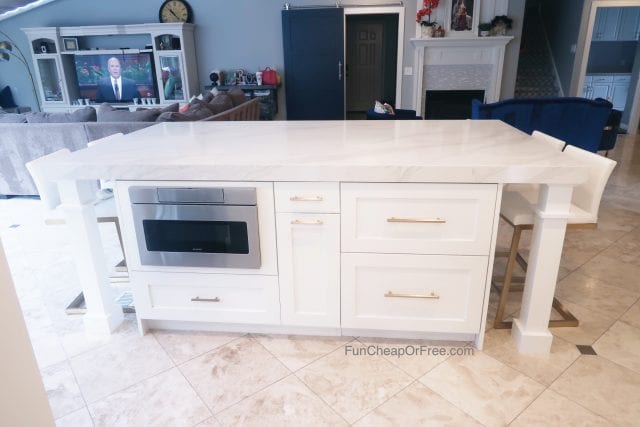
MICROWAVE DRAWER:
Our original microwave is so high, the kids (even our oldest) couldn't reach it unless they pulled up a tall chair. In an effort to teach our kids to be more independent, we decided to put a microwave drawer in our bar. Now the kids can reach it and even our 3 and 5 year olds can heat up their own food! It's been fantastic! Here's the one we chose:
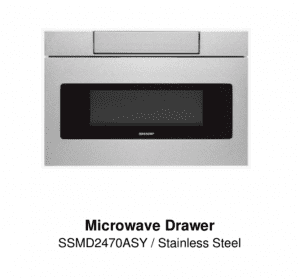
The one we went with is Sharp, it was NOT cheap, around $1,100. But we have been very happy with it. We kept our original microwave since it works just fine, and we have actually LOVED having 2. When we are doing “leftovers night” for our family of 8, a second microwave really comes in handy!
FRIDGE DRAWERS:
As mentioned in the video, we have 2 refrigerated drawers in our bar. They were pretty much in that same spot in the original kitchen, and they are Sub Zero 700VR drawers…if that helps or means anything to anyone, ha. Let me tell you what…these drawers are MAGICAL. If I had to choose a favorite thing in our kitchen it would be a toss up between these drawers and the double dishwashers. I can't tell you HOW MUCH I LOVE THEM! I think every family building a kitchen needs refrigerated cabinet drawers!! I think it's one of those things that you don't think you need…until you have them.
We use the top drawer for milk and drinks, and the bottom drawer for healthy snacks and lunch foods. It's SO HANDY in the Kid Zone because it allows our kids to get their own drinks, pour their own cereal, pack their own lunches, make their own breakfast, even whip their own eggs and cook them in the microwave. (Psst see our lunch and snack system and how our kids make their own lunches IN THIS POST.)
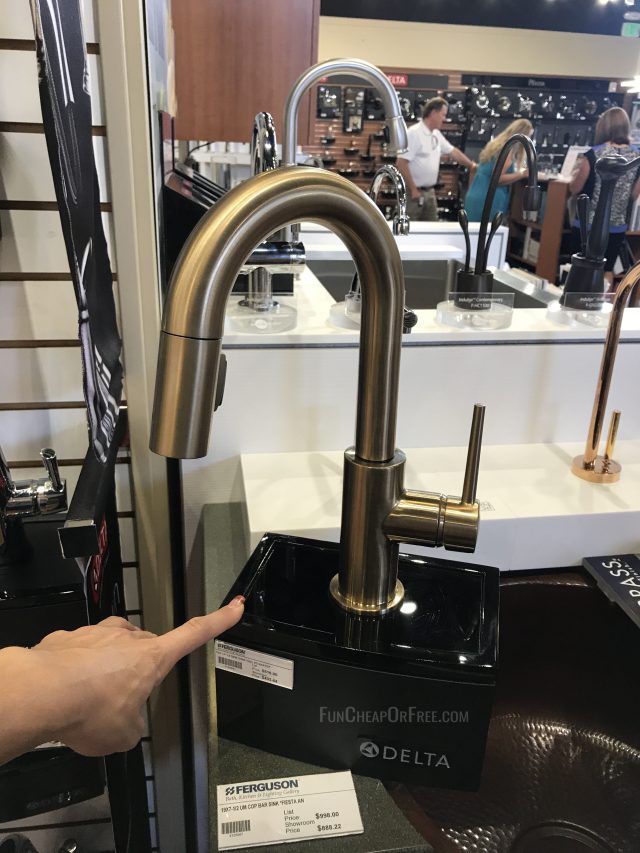
FAUCETS:
I wanted a gold faucet, and Bubba didn't want it to be too “french” or “girlie” looking. We found the perfect blend, and have been so happy with the one we chose! We went with Delta, the faucet is called “Trinsic Single-Handle Pull-Down Sprayer Kitchen Faucet with MagnaTite Docking in Champagne Bronze”. Here it is at Home Depot.

As mentioned in the video, the touch faucet takes some getting used to. When someone comes over and wants to wash their hands real quick, they always fumble with it a bit, and it's a bit obnoxious for them. But for us who live here and use the faucets daily, we are used to them and I love the touch aspect. We have had to replace the batteries a few times already which is a bummer, I wish it was rechargeable or simply plugged in rather than using batteries. But turning the faucet off completely when we aren't using the water has helped.
The matching soap dispenser has been awesome at our “dish-washing sink”, because the dispenser is far enough away from the faucet that it rarely dispenses soap when we don't want it to. At our small “hand-washing sink”, however, it was pouring out soap ALL THE TIME (even when we walked by the faucet). It was driving me crazy! So I let the soap run out and haven't refilled it since, and we just use store-bought soap. So take that feedback for what it's worth.

CABINET ICE MAKER:
The ice maker we have is Sub Zero. It's kind of the best, and kind of the worst. Here's why we…
LOVE IT:
- I drink more water! When you have a plethora of ice next to cold water, and you only like your water ice cold, the natural result is that you drink more. My kidneys thank me.
- It hides in the cabinet and doesn't look like a big, clunky machine.
- We don't have any fridges in the house that are hooked up to water/ice, so without this ice maker, we would be using trays. #NoGracias.
HATE DISLIKE IT:
- It's constantly running and produces a ton of heat.
- When we moved in our appliance repairman said “you're going to see me a lot because of this ice maker”…and he was right. We had to get something or another fixed at least every 6 months. BUT…I noticed that on hot days, or a hot time of year, our ice maker would struggle to produce ice. It was originally next to our “dishes sink”, which was against an exterior wall that got hot (the sun beats on that side of the house). I decided to move the ice maker next to the “hand-washing sink”, which is in the middle of our kitchen. It has definitely made a difference! It's still a finicky appliance that is known for having lots of problems.
- We still occasionally have to buy a bag of ice to dump in to help “prime” the ice maker and get it roaring with ice again. It's usually in the summer when our kitchen is much hotter. We don't tend to have problems in the winter months.
- We still have to buy bags of ice when we have a party, because it produces ice, but not BAGS of ice. Maybe one big bowl's worth…but then your ice maker is empty and sometimes struggles to produce ice when there's not already ice in it. See the dilemma??
My overall verdict of the ice maker…
Since we have it, we love it. Well, I love it. Bubba thinks it's dumb. But he drinks water without ice, which, he might as well drink it from the toilet IMO.
I digress.
Since we have it, and it was here before we moved in, it's great. Would I recommend for someone to spend so much to put an in-cabinet ice maker in their kitchen? Nah. Probably not. Unless it was a new fancy one that worked better than ours? And they were bajillionaires and don't mind the $60 service calls every 6 months? In doing the math, you can buy a lot of bags of ice for $60…and since most fridges have ice and water dispensers in them…I'd say save your money and go with the fridge dispensers.
MISC. PRODUCTS:
Here are some of the little products mentioned in the video that I'm sure some of you will want links to:
- Family scripture study books
- LED night lights
- Foldable stool
- Clear recipe holder. I couldn't find my exact glass one, but HERE's an inexpensive acrylic option with good ratings, and THIS ONE looks nice and sturdy and adjustable which is nice.)
Aight, now on to the next zone…the “Cooking Zone”!

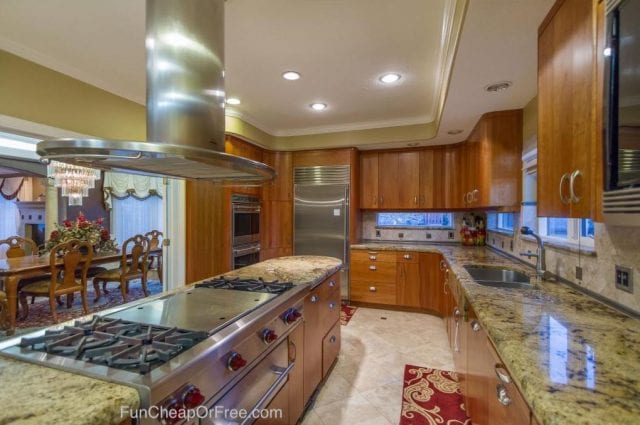
As mentioned in the video, the main differences in the cooking zone were 1) moving the cook top off the island, 2) ditching the giant (and extremely low!) range hood, moving the ovens, and sliding the island away from the counter so there is more walking space with the dishwashers down. The functionality of the space has become so much better for us!
Here is a breakdown of the space:
COOK TOP & WARMING DRAWER:
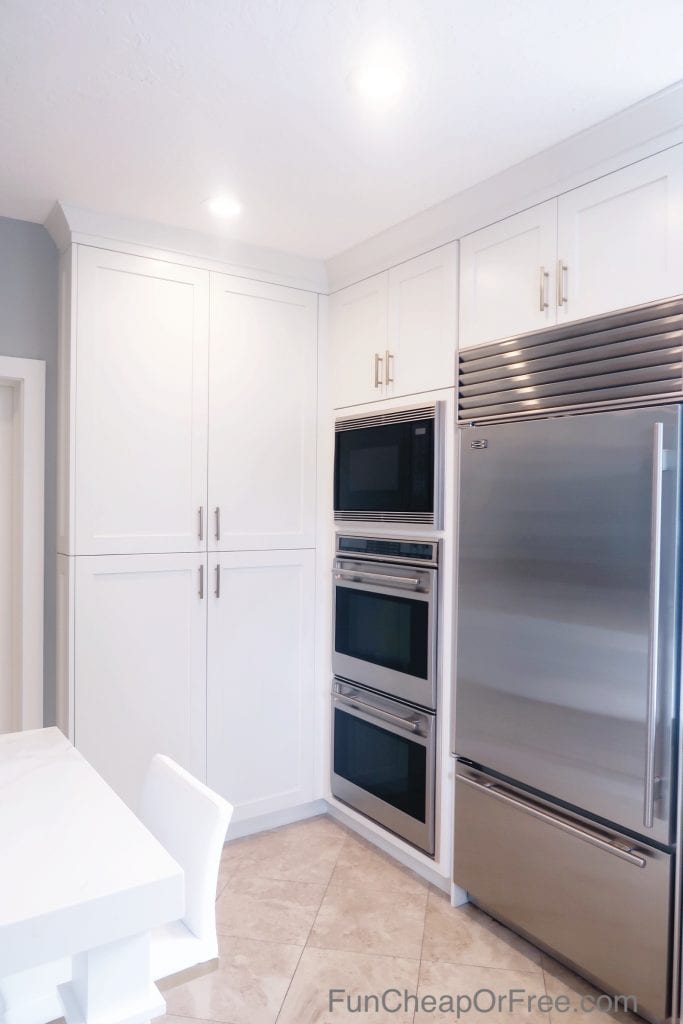
We kept the original cook top (and if you haven't noticed, saved a TON of money by reusing all the existing appliances!), which is Wolf brand. It has 4 gas burners, as well as a griddle AND a grill in the middle, which we love. One of the burners didn't work when we moved in but we got it serviced during the renovation and now it works like a champ! Super happy with it.
Across from the cook top is a Wolf warming drawer. Also something that we would probably never think to put in ourselves, but now that we have it, it's pretty cool. Keeps food warm until you are ready to serve and eat. The one downside to this drawer is that it's not very tall, so some of my pots and dishes don't fit in the drawer because it's so shallow. So it really only works with shallow casserole dishes. For this reason I admittedly don't use it as often as I should; I sometimes forget about it entirely. So I would put this on the “cool to have but not necessary” list.
POT FILLER:
When I asked your questions on Instagram one of the most common questions was… “Is the pot-filler worth it?” Here's my answer:
If you are down to the studs (whether building from scratch, or doing a major renovation like we did) then YES! 100%! Absolutely! It was only about $500 to add it and I use it every single time I cook with water on the stove.
If you are working with an existing kitchen/plumbing/drywall…then no. I would not recommend getting one. My guess is it would be very costly and invasive to dig into the wall behind your cabinets to plumb for and install the pot filler, so you'd probably be better off just filling your pot at the sink. Consider it a good arm workout :).
MISC:
- Spice drawer, pot lit organization, and other organization ideas in THIS kitchen organization post.
- The barn doors were custom from a company that I'm not even going to link to because they were TERRIBLE to work with.
Now, on to the next zone, which I call the “Cleaning Zone”!
DISHWASHER(S):
The #1 thing I was most excited about in this kitchen was…DOUBLE DISHWASHERS!! We cut other things out of our budget to make room for a 2nd dishwasher, and to replace our old one with a new one. My word, I would do it 10x over! I have never loved doing dishes more. I can't say enough about the benefits of having 2 dishwashers! (Well, if you are a big, giant family like ours, that is.)
We went with Bosch dishwashers (this one to be exact) after asking you Freebs for your recommendations and advice, and we LOVE THEM. I was concerned that they weren't going to dry my dishes well, as per some feedback I had received from others, but we haven't had an issue at all. As long as we keep it full of Jet Dry it dries dishes like a champ. They are super quiet, clean incredibly well, and I love that we were able to put custom cabinet faces on them. They were $900 each, so selling our cabinets for $2,000 was awesome because it cancelled out that cost for us!
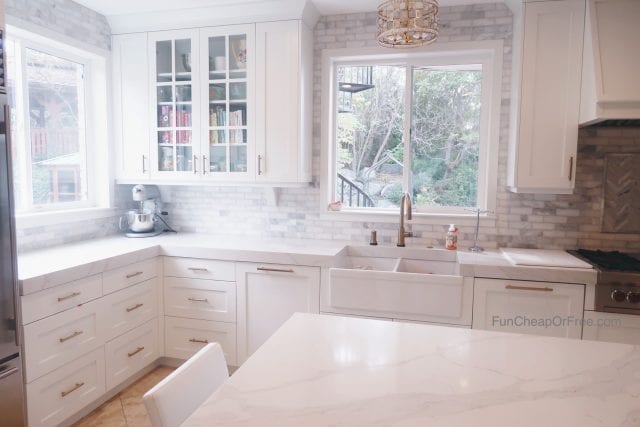
SINK:
We went with a 33×9 white Fireclay farmhouse sink. It has a divider in the middle and a disposal in the right sink, which, as explained in the video, is something I love. We got a custom wire rack that fits in the bottom of our sink so dishes don't scrape the bottom, and so food can rinse down the disposal even with dishes in the sink, and we definitely recommend them. I don't know what they cost because he gave them to us for free, but just know I highly recommend them.
We have the same faucet and soap dispenser at this sink as we do at the hand-washing sink.

Next stop is our Baking Zone!
WINDOWS:
Interestingly, really the only major change in this area to talk about are the windows! As mentioned above, the kitchen was exponentially darker before our renovation, because there was only one window above the sink. We took down cabinets, had a handyman blow a hole in the outside of our house to put in a window, and then expanded the window above the sink. I can't express what a difference this has made!
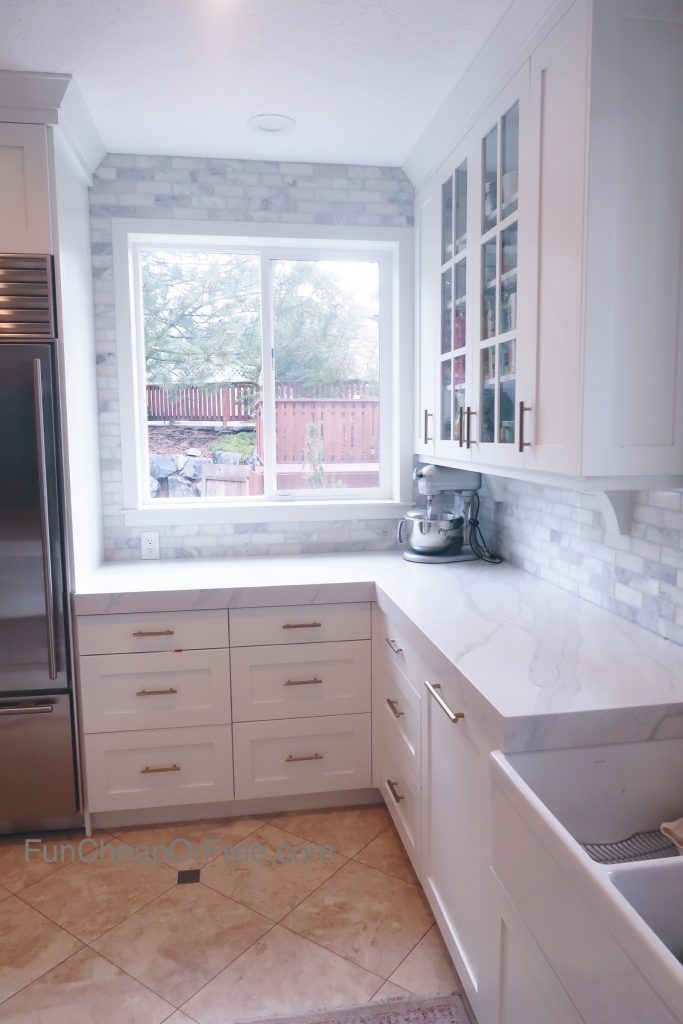
The other big difference was moving the ovens (so we could scoot the island away from the sink), and putting in our tall, shallow cabinets that come in handy with water bottle and baking good storage.
Oh, and yes, double ovens get a big thumbs up from me! Both ovens were in the original kitchen, and I use them ALL THE TIME. I love being able to bake multiple things at once!
I think that's all to cover in this area…right? Or am I missing something? Leave a comment below and let me know if you have any questions about this area!
Moving on to the last zone, the “Serving/Entertaining Zone!”

If you know us, you know we LOVE to entertain! We are constantly hosting parties, BBQ's, and gatherings, and try to have people over for dinner just about every Sunday. One of my complaints was not having enough space for all my awkward serving dishes and such.
The solution?
A built-in “hutch” in our formal dining room!
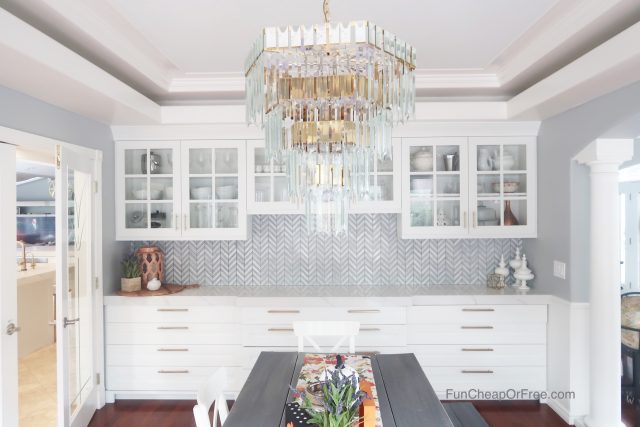
BACKSPLASH:
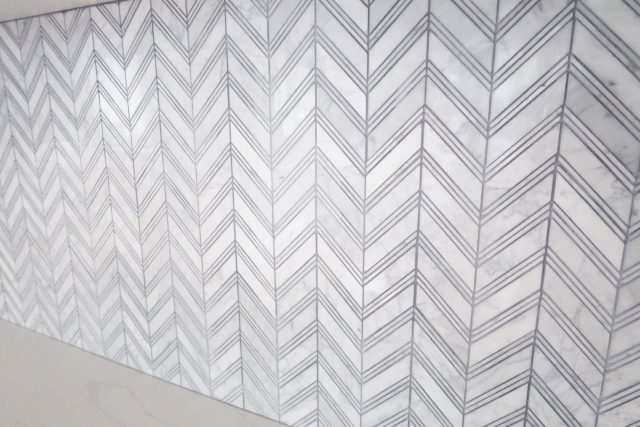
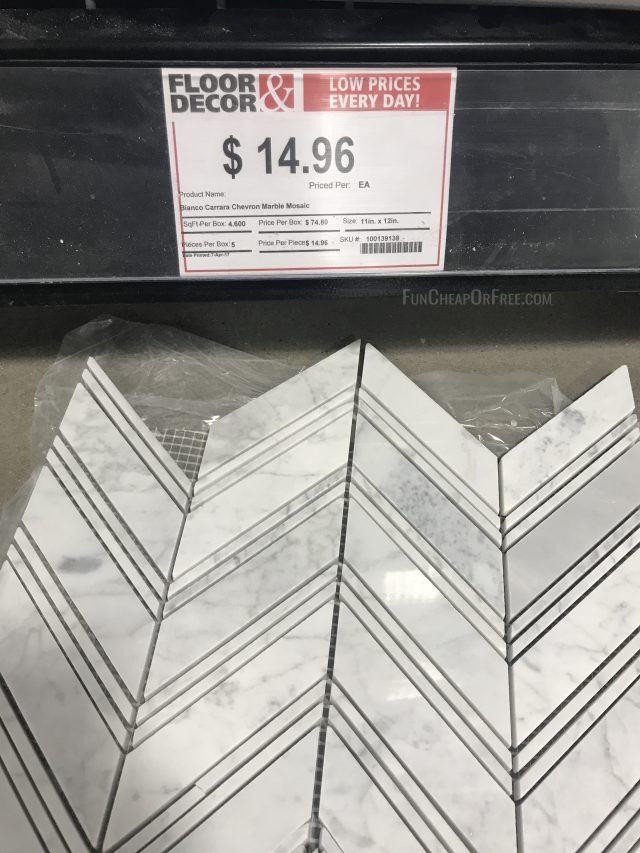
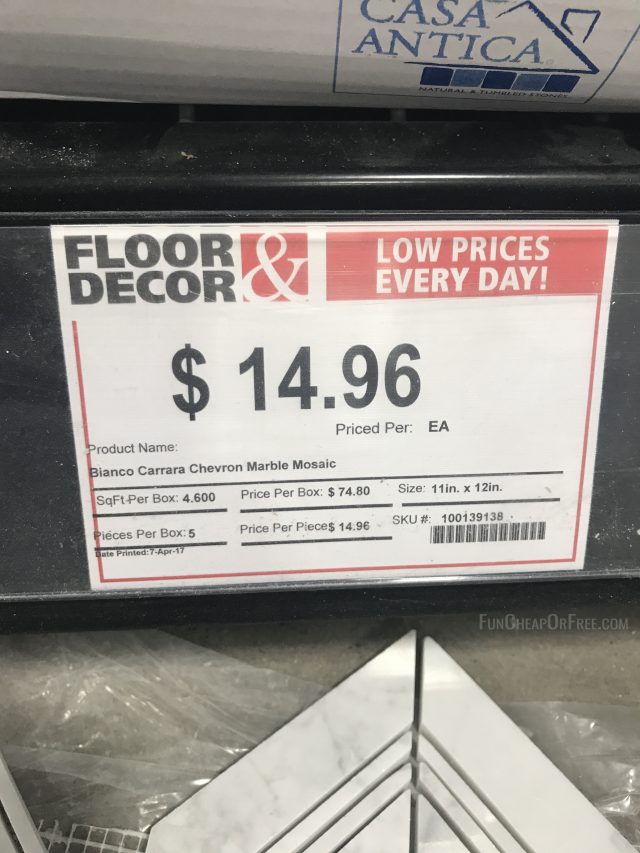
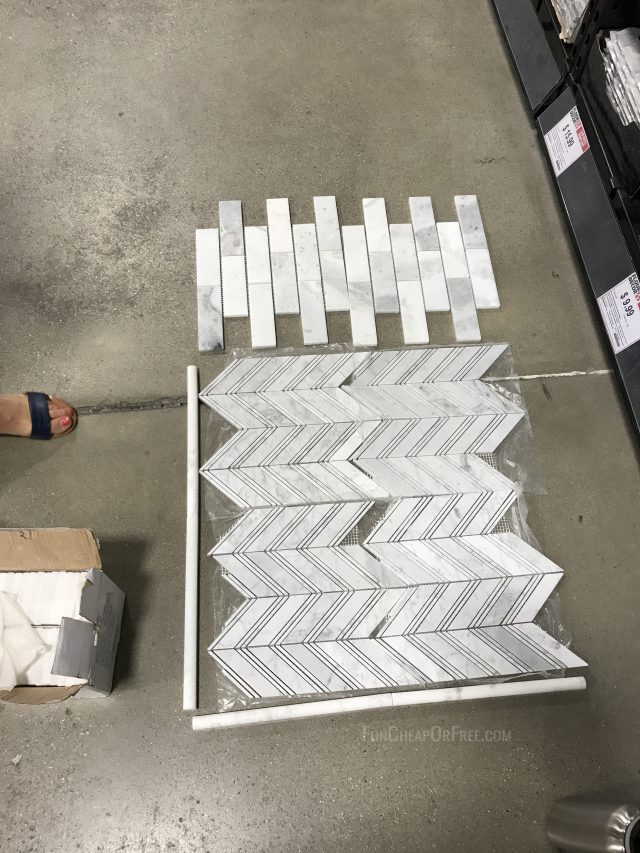
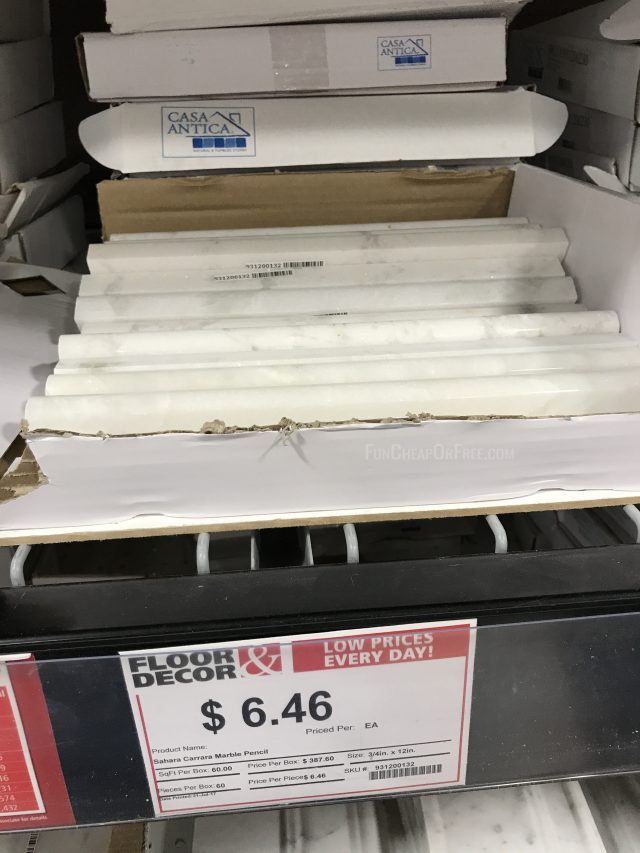
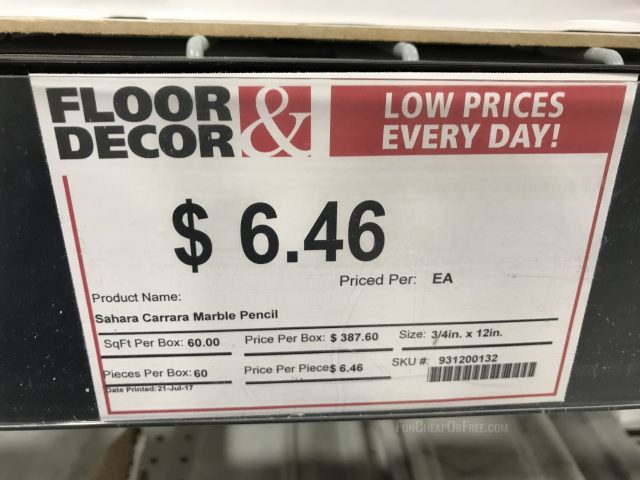
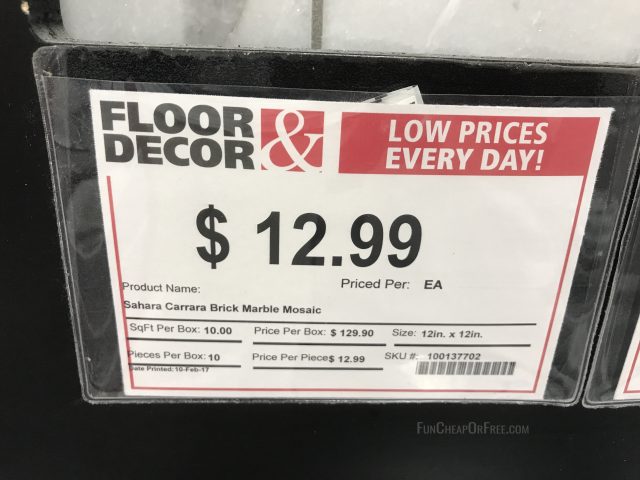
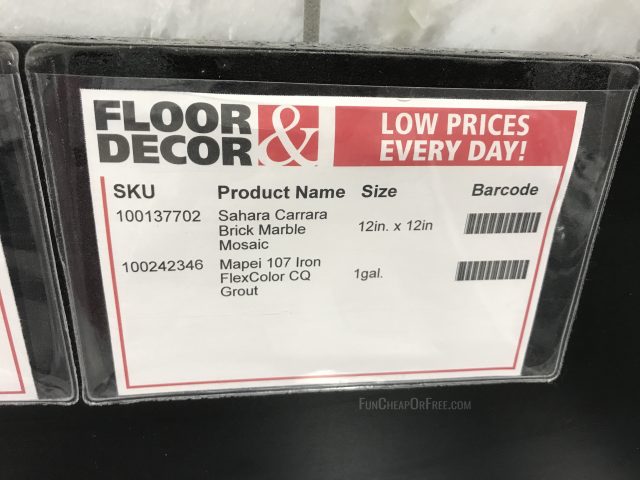
Unfortunately I can't find any information on our herringbone backsplash, I'm so sorry! We got it from Floor and Decor, it's a marble herringbone tile, and we bought the last of the lot (I guess they have discontinued carrying it). If I find something similar I will link to it for you!
This is what our designer said about the subway tile in our kitchen: “The backsplash would have different availability depending on which state you live in. But it is a subway Carrara Marble Tile, fairly standard. People can price shop this one. The key is the size and finish. So polished or honed, and we did honed.”
For me, the real trick was taking it aaaaaaall the way up to the ceiling. Really opened up the space and made our ceilings feel taller than they really are!
CABINETS:
As mentioned before, we used Summit Cabinets and they did such a great job in this space. Originally, those 4 drawers were all separated and were super shallow drawers. After the cabinets were installed, however, I decided I wanted the bottom two drawers to be combined in each of the sections so I had 3 GIANT, extra deep drawers. They combined them for me and I'm so glad I have those deep drawers now! They hold so much. I found the invoice and the built-ins in this space were $4,470.
The last space I will lump together and refer to as the “Sunroom”. In this space there are really two sections: the banquette, or breakfast nook, and the “game area”.
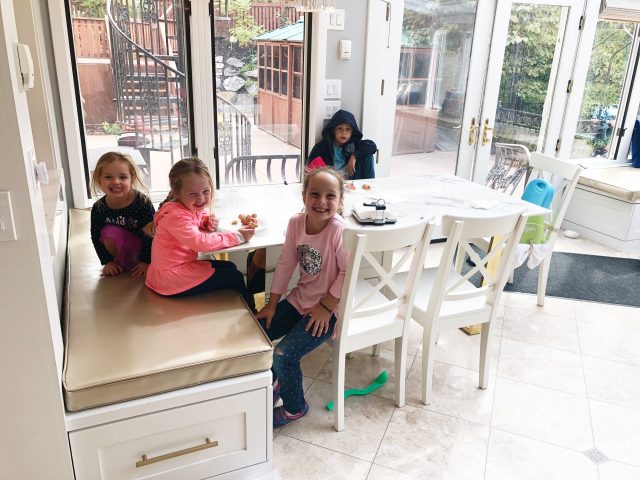
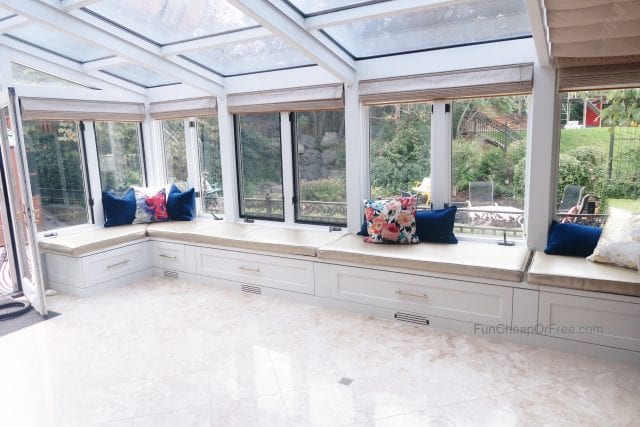
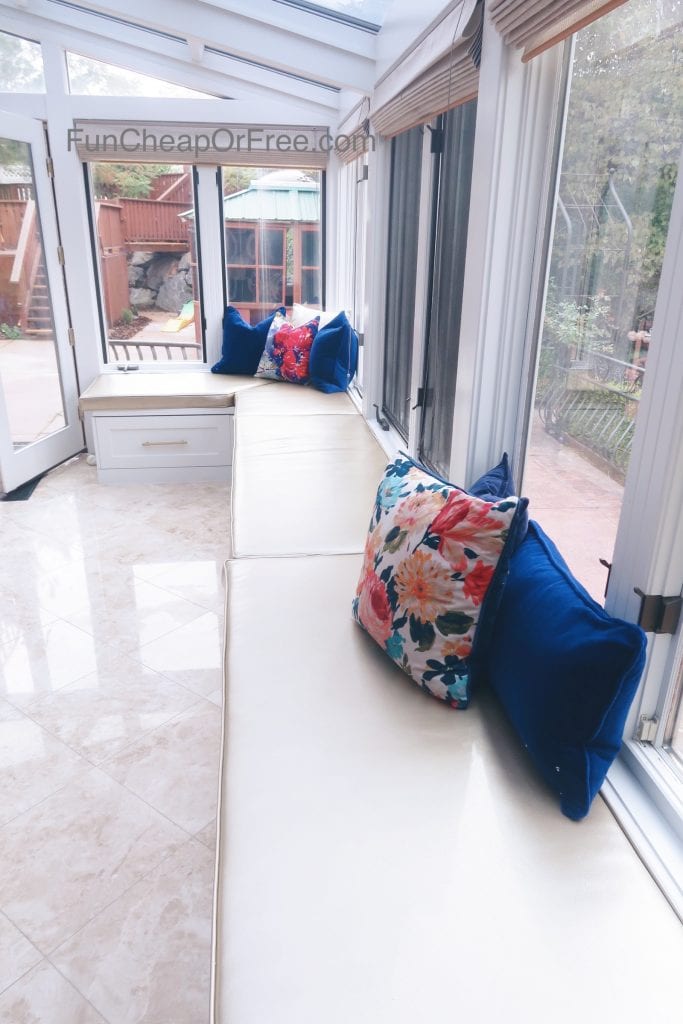
BANQUETTE:
This was originally designed as a way to fill an awkward space. I never anticipated we would use it as much as we do! It has become the place where we eat 90% of our meals, where we do homework and puzzles, where we play games as a family, you name it! It's been great and we are so happy we built it in.
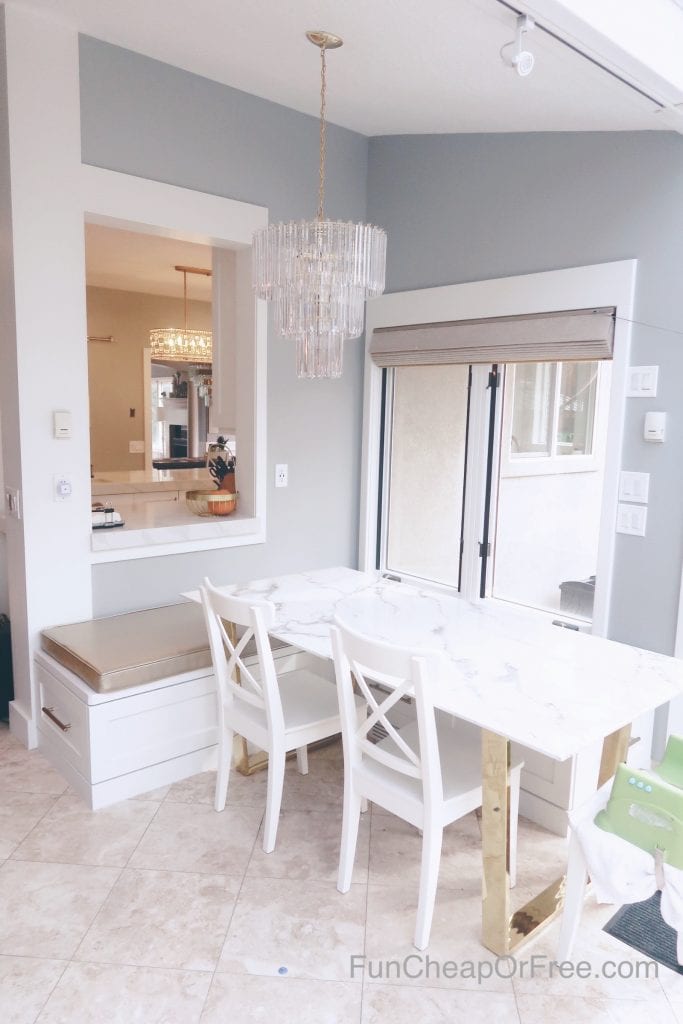
We had our cabinet guy build some window seat-type cabinet benches along both sides of the sunroom, then we had custom cushions made. We used heavy duty gold vinyl, so they are extremely easy to keep clean (glory alleluia!). Our designer found the seamstress for me, @TheSewingNerd on Instagram. She did a great job and the cushions fit perfectly and have held up well.
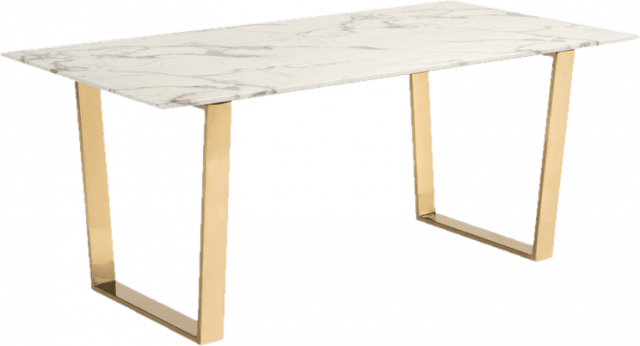
I know the table doesn't technically fit perfectly in the space. We had a round table for a while that technically fit the space better, but didn't fit our family well. We opted for this faux marble table from Wayfar, and have been so happy with it! We have decided it's perfect for us. Maybe it'll never make a magazine cover because the design mojo is off somehow, but we just don't mind it one bit.
SUNROOM:
We had our cabinet guy mimic the same seating as in the banquette area, but we made the drawers massive, so as to fit all our board games and puzzles. (The cabinets that are close to our couch are lift-top instead of pull-out drawers, though! But the fronts were made to look like drawers so they would match. Sneaky, right??)
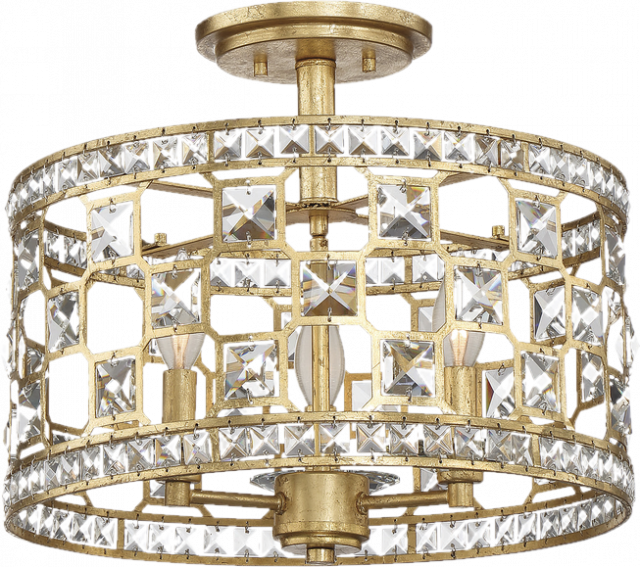
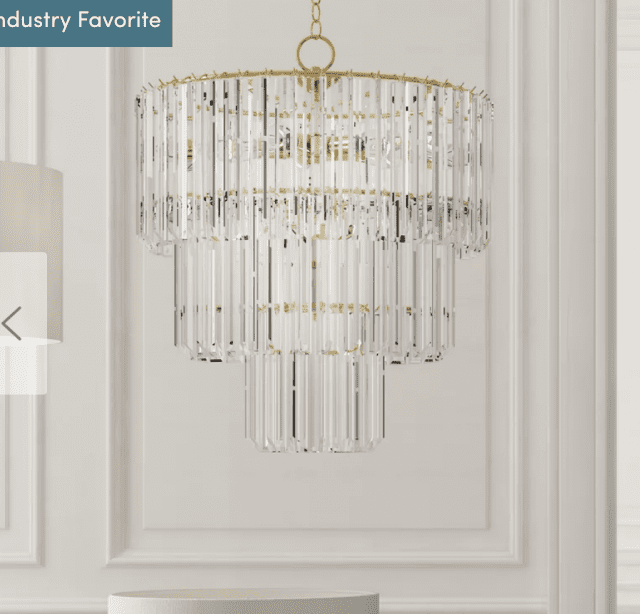
Here's our flush mount bling light (as I like to call it) that we put above our sink:
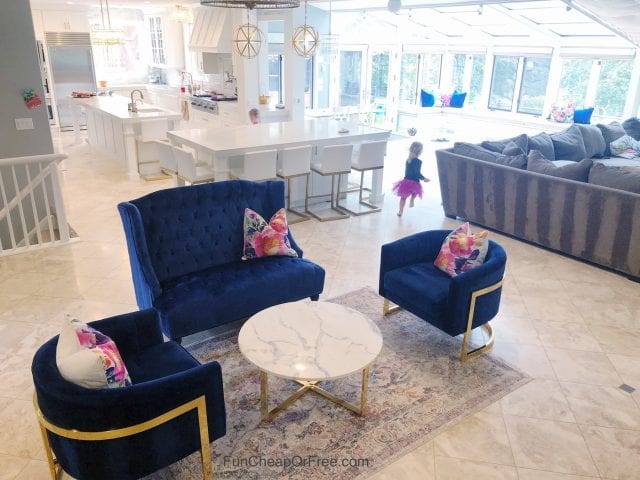
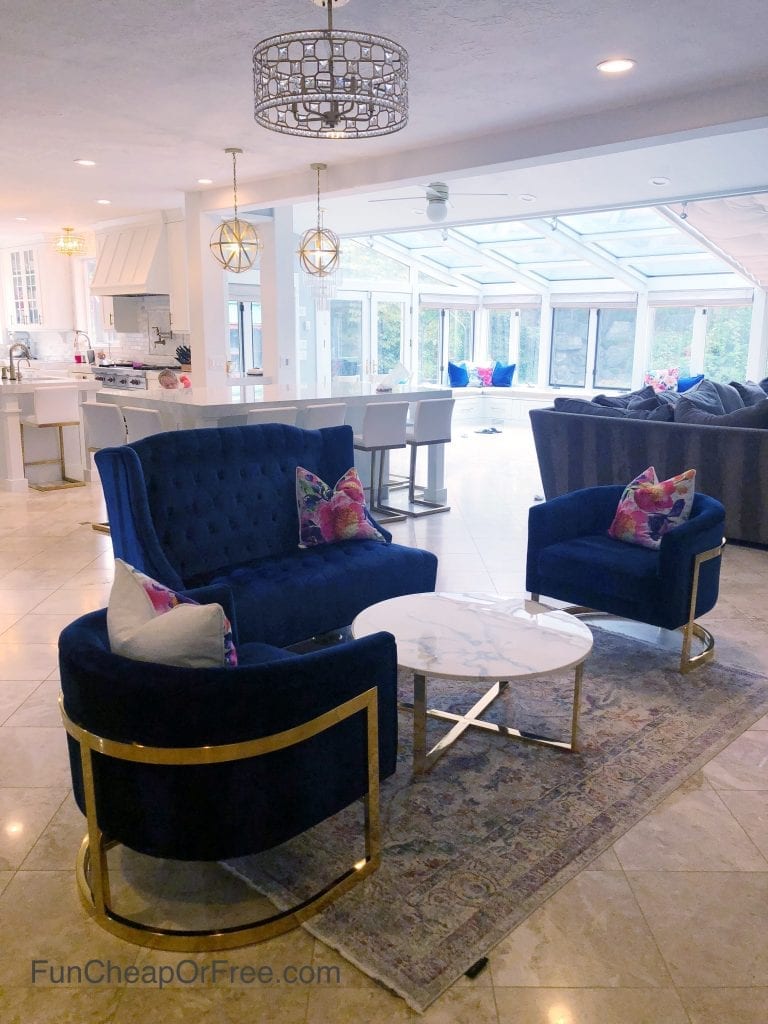
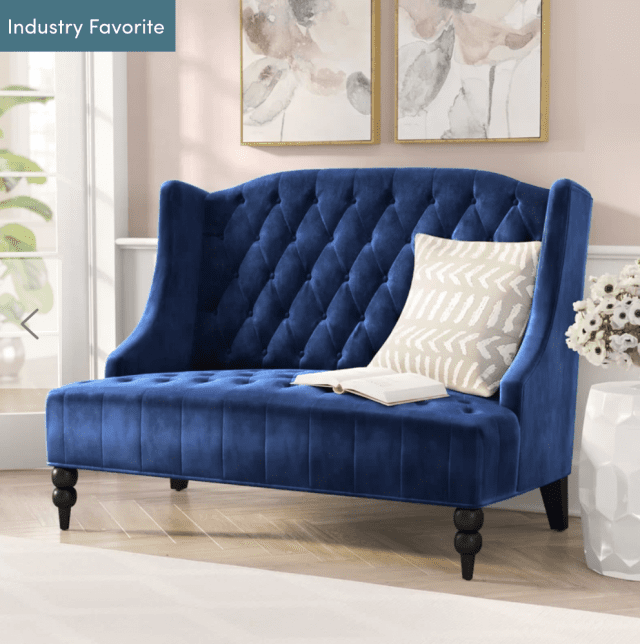
And here's the bigger version that we have in our sitting area with the blue velvet chairs:
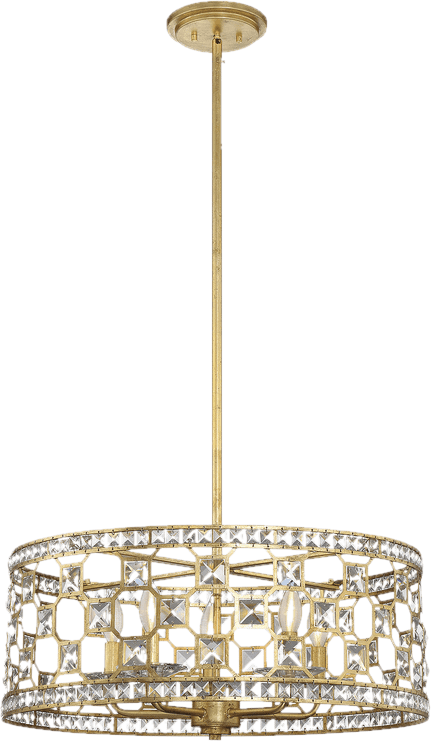
These Grisella “crystal” chandeliers were the deal of the century, we snagged them for just $100 because they were low on stock!!! They aren't real crystal, they are a pretty light-weight plastic. But boy, you could never tell, they look amazing in our kitchen!
Unfortunately, it looks like a bunch of the lighting we bought is no longer available on Wayfair! So here's what it is in case you can find it elsewhere:

We turned an awkward central space into a seating area:
And here are the pieces we used:
Blue barrel chairs (in Navy):

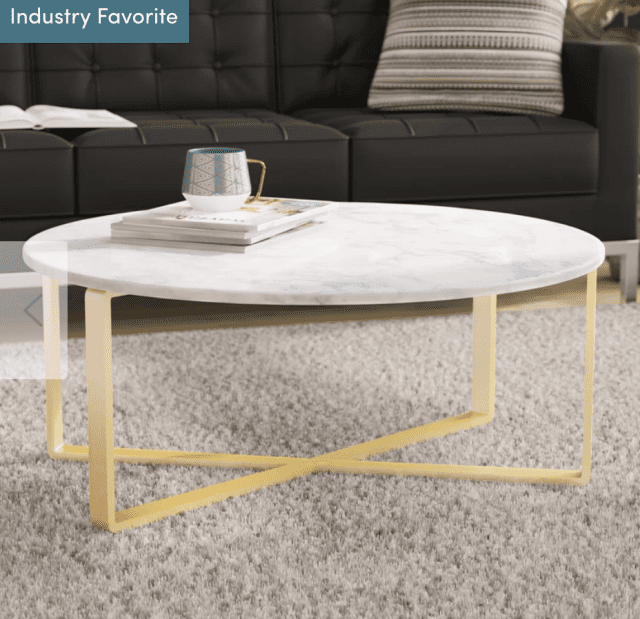
We went for this marble coffee table:
Here's our faux marble dining table. We had to wait 3 months for it, definitely worth it!
BAR STOOLS:
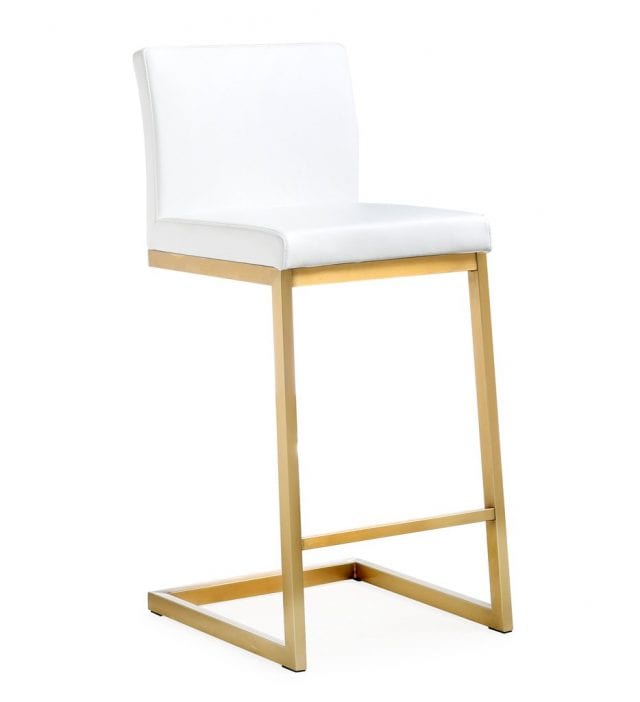
Bubba found them and was adamant about them. I wasn't convinced white bar stools would be good, but I have to say, he was right; they've been great! We got them online here, and at $290 for a set of 2, they are really affordable for how sturdy and beautiful they are! Just a reminder to sign up for Ebates any time you shop online! You get cash back for purchases you make, without it costing you ANYTHING extra!!
* * * * * * *
WHEW! I think that's it!
Geez. Did I miss anything? I sure hope not, but if I did, leave a comment and let me know!
I hope that answered all your questions, and gave you insight into this giant project! Hopefully it gave you some ideas for your own home as well.
What did you think? What's your favorite part? Let me know below, and thanks for your patience as I put this post and video together!
Now…if you don't mind…gotta go make dinner!

Love this post! What was the full name of the designer/architect you used (I want to look her up)? Thanks!
Yes, I’d also love to know the name of the architect/designer! We live in Utah county and are in the beginning phase of looking who to potentially hire for help with our kitchen reno and need major help!
You’re done a amazing job and your kitchen and dinning is my dream. Could I ask the name of the Tap that does both the hot and cold water the one in the kid zone they use for there porridge. Also what brand is the your Tupperware
I totally totally understand with the renovations! We did ours in 2017, cabinets yes our number one splurge. We did The warming drawer and love it. also on the subzero fridge and WOLF would not go to anything else at this point! Love the quartz, we love ours. Go big or go home that’s what I say! Blessings to the new addition to the family.
Any details you can share on your barn door? I really like the streamlined track & hardware and we will be implementing a similar element in our kitchen remodel next year.
Everything you did looks awesome!
Yes I Wallis like to know I do in the barn doors as well!!
I have been waiting for this post for so long, thank you! You did not disappoint.
Absolutely stunning make over! That is an awesome price for all the cabinetry! I redid my whole kitchen which is not near the size of yours and my cabinets cost about the same! I have one really small question… What kind of drying rack are you using for your pan lids?
I couldn’t find the exact one I use, but something like this would work similarly: https://amzn.to/2pIKcF9, or this one: https://amzn.to/2QCtpis
Absolutely beautiful! And being pregnant through it I don’t blame you one bit for hiring out everything. You are amazing to survive it!
I love, love, love this!
I didn’t see, but maybe I missed it, what is the backsplash in the kitchen?
I would love to know this as well. You guys did an amazing job with the Reno, this is a dream kitchen.
Oh yes, forgot to add it in. It is Carrara Marble Tile. I have added more information and pictures to the post.
Wow! It’s BEAUTIFUL! You did such a great job! But, I have to say that I’m pretty sad you got rid of those sweet attached chairs, haha. & holy curves! The builder of that house did not like corners!!
This post was so incredibly helpful! We are saving up to renovate our kitchen in a year or so and I found so many of your ideas extremely inspiring! Your kitchen is beautiful! I especially love all the white and gold finishes!
I actually have a question. What are the dimensions of your kitchen? It’s amazing and I’d love to know how much space you need to fit in all that stuff.
I’d love to know dimensions too! We are building, and I want to use your kitchen as inspiration!
I love the design that you came up with for ease-of-use with the kiddos and the various zones in your kitchen. Especially love those deep drawers for the pans, utensils, baking. Handy and sensible. Going to remember the Bosch dishwasher, ours is stainless steel, 19 years old, Kenmore Elite and still works like brand new… It’s a champ. But when it needs to be retired, I’m already eyeing those Bosch dishwashers!!! Thanks for sharing your kitchen project, Mama J. Hugs to you and yours! Xoxoxo
Beautiful. Make sure you put your crockpot or other hot things on a cooling rack with potholders underneath! I learned the hard way when it cracked!
3 quick questions – do you have a built in vac system? (Thought I spied one) If yes – do you like it? Why or why not?
Yes we do, but I never ever use it! It’s clunky. I love my Dyson and all the lighter cordless vacuums on the market today, so central vac needs are obsolete in my opinion.
Oh my gosh!! Not only are you an amazing mom, you’re also an amazing blogger!! Thank you so much for your kitchen tour (gorgeous!! And you will always be so happy with a white, cheerful kitchen ?) I can’t believe all the details you shared. So appreciated. Many blessings to your family. ?
Beautiful! But you forget to mention the gorg floral pillows- where are those from?
Thank you! They are from TJ Maxx and home goods.
Dream Kitchen ???
your kitchen turned out beautiful…Love it. How much were the countertops? Love the thickness of them.
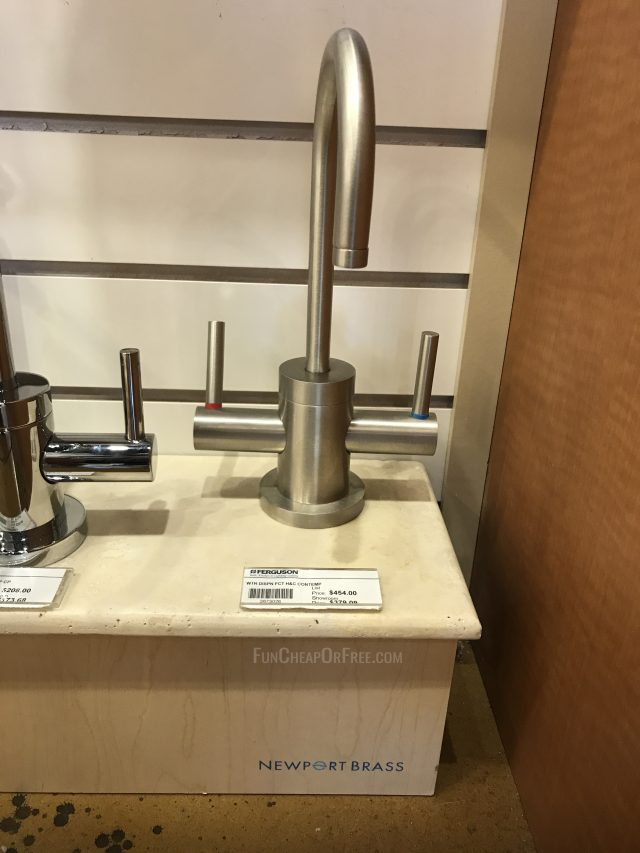
My husband wants to hide in a corner xD he’s a plumber and not liking the ideas I’ve gotten. Too bad for him! One thing I wanted to see info on, unless I missed it, was the instant hot faucet. Love that idea!
I forgot to add it in originally, but have posted the pictures of it, under the faucets section.
I’ve tried to find it at Newport and mountain but I can’t find the exact one you had 🙁 Could you please write more detail about how you got the color and where to get that hot and cold dispenser?
I love your Navy & floral pillows! Where did you find those? I’ve been searching with no luck !
Thanks! They are from TJ Maxx and home goods.
Beautiful! And so functional! Would love to see some dimensions of the kitchen and layout, meaning how much space you left between the island and stove area, etc. I am designing a kitchen now for a new construction and am stumped on the island size dimensions and how much space to leave to walk.
I would love that information as well!! what is the space to walk around the island? In CA the standard is 36 inches.
I think this took me as many days to read this as it did for you to write it! I had to watch the videos and read every. single. word! Your kitchen is like my dream kitchen; so many things true to what you said, I didn’t know I wanted until I saw them. Like ALL drawers, no cabinets, refrigerated drawers, thin cabinets for shaker bottles and protein powders. We have a lot of wasted space in our kitchen so this will be a great space to start!
What a beautiful result, worth waiting! Lovely home for a loving family.
That was awesome! I love how all of your selections go so nicely together! It is nice that you were able to design your kitchen around how your family lives in that space.
Thanks for this awesome run down! You kitchen looks beautiful. Did you guys do any under cabinet lighting?
Yes we did! We have a switch the turns on under-cabinet lights in the formal dining room, the kitchen, and the homework desk area.
Hi! I loved this post so much but was hoping to find information on your couch. We are couch shopping currently and I am finding it very difficult. We currently have genuine leather (my parents old couches but they’re a wine/burgundy color) and with two toddlers and one on the way I have loved them to just wipe clean. I noticed your couch is a fabric one. How has that hold up with all the kiddos and sticky fingers and such? I’m having a hard time with the leather colors, look, and $$. Would love to have your take on fabric couches and any tips and tricks!!
Wow! What an impressive and extensive Blog post! You are AMAZING!!!!!
I know you didn’t want to talk overall numbers…but we are saving up for a pretty large kitchen/dining/living room renovation and trying to get an around about number. We are shooting for $50k which will take up 5 hrs to save for? but it’s super important to us to pay for this with cash. We are big DIYers and hope to save a lot doing things ourselves, reusing our current appliances, etc. And how far out from the project did you hire your designer? Thank you so much for all of the great info on your blog!
Oh my goodness I am in LOVE with your kitchen!! Seriously, that would be my dream kitchen!! Maybe someday… 🙂
DId you have any issues with the flooring when changing the layout and moving the island? Any spots you had to fill?
We had to fill a few spots but luckily not many, and luckily they left behind a few tiles!
Beautiful and love how well thought out everything is:) Tiny question- Do your little kiddos not dig in drawers a lot, or do you have a secret I need to know???
what is above your two ovens?
Are you’re marble floors heated? I see you barefoot in your morning routine video and I think “burr”! Redoing our kitchen and trying to decide if it’s worth the extra cost to be heated.
Hey! This is so little but the biggest thing that caught my eye was the power strips under the counter. I have googled, amazon’d Etc to find them but I can’t! Where do i get them?
I’m not sure, our electrician found them for us. So sorry!
Heather, did you ever find the answer for this? I’m in the same situation you were! 😭
Hi Jordan you have a beautiful kitchen! I will like to know which brand are your fridge and ovens ?
Thanks you!
Thanks! They were here when we moved in, I’m not sure of the brand, sorry!
The kitchen renovation is not an easy task everyone is worried about it how to get the desired results. The blog with all the details regarding kitchen renovation is very helpful. Thanks a lot for sharing it. The pictures added in the blog is really helping to think about the design and layout of the kitchen.
Thank you so much for your kind words!
Where did you get your white chairs in your banquette?
Adore this kitchen and inspired by your story of saving up for it! Do you know where you got your fans? I love them and promise I scoured the post and didn’t see a link. Maybe they were from pre-reno!
Thanks, Jess, that’s so nice to hear! What fans are you referring to? We had ceiling fans pre-reno, but took them down and put up our GORGEOUS (if I do say so myself!) light fixtures in place of them.
Wow, this is really informative and helpful. Awesome blog by the way and thanks for sharing all of this information.
Thanks!
What are the dimensions of your kitchen?
Can you link the chairs?
Which chairs are you talking about? I have my furniture linked up at the bottom of the post 🙂
Thank you this was an amazing post. I do have a question. What brand is that filtered water system that delivers hot and cold water next to your sink?
THIS is the faucet, if that’s what you’re asking!
Hi there. We’re currently building and looking into ALL this stuff. We also have five children. Now that you’ve been in the new kitchen for some time, would you mind telling me please how the fireclay sink is doing? Any scratches, chips or stains? Would you mind telling us what brand you went with? We were originally looking at a granite composite but I have a friend who says it’s not practical (she has it in white). Thank you!
Hi, can you please tell me if your countertop quartz still in the market, I can not find the name Calcatta quartz, now days all the Calcatta has another name attached to them including sequel calcatta. And what is the thickness of your countertop? Thanks, love your kitchen.
Hey, Beautiful Kitchen Remodel !!! May I ask how much approximately this cost you in total?
I love your remodel! Can you share the paint color on the cabinets and also provide any additional information you can about the thickness of your counters? They look to be thicker than most, is that just the way the edge is cut?
Thanks.
We no longer have the paint color on the cabinets, so sorry! The counters are normal thickness, you can just make the edge a little wider to make them look thicker!
Thanks for sharing the renovation details of your kitchen! People who thinking to renovate their kitchen would find this post really helpful!